How to paint skin like Demon Color

In response to all the questions about Demon_Color’s way of painting flesh, we are presenting his own description of how he does it… So let him tell us how to paint skin like he does:

Method one

The skin on the Ogre is painted in two ways. The first way is with use of my favorite lines. I use lines to paint surfaces where are lots of curvatures and raisings on small areas – for example hands and faces.

In the beginning we must choose a raised area, for example a muscle. We have to position front and back of the chosen area. On the front of the area, we choose a place where we will start painting our lines. Now with a fast pull we draw a line from the place we have chosen to the back of the surface. Next we continue drawing other lines right next to previous line but just lighter one. After some practice the lines will look dynamic and will give some dynamism to painted in such way surface. Everything depends on predisposition and skills of the painter. Not everyone will be able to paint this way – you have to love lines to get it right.

Photo: Painting skin - Tutorial

We must pay attention because painted surfaces can look like naked muscles – in shorter words – our miniature can look like skinned alive. When I look at my earlier miniatures I see that some of them have tendency to “walk without skin” – and a few times I’ve been pointed out about that.

Method two

To avoid that I use the other method of painting skin – soft transitions. I use it mainly when painting large, flat surfaces. Everything goes just like with blending, but mainly on semicircle surfaces (in the case of Ogre – blade-bone) I use a characteristic line which will mark out the area of the blade-bone.

Photo: Painting skin - Tutorial

Colors used

For both methods I use the following colors (Vallejo paints):

  1. DARK FLESHTONE nr 44 (GW Bestial brown)
  2. PARASITE BROWN nr 42 (GW Snakebite leather)
  3. sometimes COBRA LEATHER (but rarely) nr 40
  4. sometimes SCROFULOUS BROWN (rarely) nr 38 (GW leprous)
  5. DWARF SKIN nr 41
  6. PALE FLESH nr 3
  7. WHITE

How to paint faces – Tutorial

Painting faces is one of the crucial parts in miniature painting hobby. Unfortunately many people give up before even trying to master this skill. This tutorial explains how to paint faces, but in fact it’s much more than that. It also teaches how to use colors for shaping your miniatures, how to create sense of depth with colors, how to make skintones interesting, and how to play with color nuances on your miniatures. To put it shortly: it’s a must-read for every aspiring miniature painter.

Well, with this I believe that the subject of the faces is complete. In this tutorial I address location of lights and shadows, midtones and tones to heighten and to disguise volumes. In addition it’s expanded with color palettes and tones for different surroundings, specially focused to the four seasons.

Palettes

First of all, painting a face is thinking about the palette of colors that im going to use. A very common mistake between painters is to be accustomed to a mixture and to use it for all type of skins. They finish doing monotoneous and little realistic works when they paint faces in particular circustamces. This can be minis under a strong light, bronzed by the sun or when trying to represent figures of different ethnic groups in the same diorama.

In the picture below it’s possible to observe some palettes that I have created for the occasion. One is a generic palette of brown neutral, very similar to the one I use for base colors, accompanied by other four sets of tones. Two primary pallettes (Warm and Cold) and 2 mixed. The intention is that mixing the palette of generic with the suitable palette of tones we pruned to give the atmosphere that we wish to surround our miniature.

How to Paint Faces - Tutorial

The first palette of tones is the one that we will call generic.

How to Paint Faces - Tutorial

They are the typical flesh colors that have a neutral tone and that we will turn to warm or cold according to our chioice. Andrea’s flesh paint set, basic skintone (VMC) , brown cork, light flesh could be colors of this type.

Later we have the palette of warm colors.

How to Paint Faces - Tutorial

This palette is the ideal to use in a summer atmosphere since the thermal sensation of its colors evokes the summer period. It uses ochre and orange colors for reddish the midtones and brown tones for the zone of shade. Flesh is illuminated as well with a yellowish color that simulates the direct solar illumination.

In the opposite side we have the palette of colds.

How to Paint Faces - Tutorial

This palette would be adapted for a winter typical scene by the temperature of its colors. One is based on pink for midtones and blue or violet for shades. The illumination is made with a greyish color that does not warm up the lights.

So how to paint faces with these palettes?

We can see a compared example of both palettes in this digital painting recreation (miniature was only digitally painted).

How to Paint Faces - Tutorial

How to Paint Faces - Tutorial

The mixed palettes correspond to mixtures between cold and warm colors. Indeed spring and autumn match in their intermediate temperature so we are able to use them indifferently.

The spring palette that I have taken is this:

How to Paint Faces - Tutorial

This composing in its majority by cold colors since my intention is to intone with the intense green color of the leaves at this time. The midtones will be of a pink-orange tone and the shades will go in fucsia. The lights became a little grey applying some greenish tone to the skintone to simulate the dragged pallor of the winter.

Finally the autumn palette, that is the following one:

How to Paint Faces - Tutorial

Composed in its majority by warm colors to intone with the leaves of fall and a cold touch that represents the temperature of the atmosphere. It uses a pink color to simulate the cheeks attacked by autumn cold. The rest of colors: ochre and brown game with the landscape of withered leaves.

Once we selected the color palette to use, there is another aspect to consider. On many occasions the “flesh” colors are colors very saturated to represent the average tones and it’s better to grey them a little to obtain a greater realism. (It is not the case of the miniature that I painted, since the gray tone is present as much in average tones as extreme.)

Here I put an example in a figure by Vincenti for you (that’s realism):

How to Paint Faces - Tutorial

Placing highlights and shadows

In the miniature where the positioning of lights and shades will be explained (Space Marine). I decided to grey all the face and then to heighten the volume giving tones. For the base I used the second base of the Andrea’s flesh paint set who has an intense orange brown color. I toned the color down by adding azur that is approximately the complementary color. Once applied the base it is the moment for adding the lights and the shades. Each face is different but more or less there are certain elements that all have in common. There are zones that always will be in shade and zones which always will be in light and this with some practice you will learn to see it automatically. The light focus is very advisable, for aesthetic reasons, to turn it a little to give more realism and to personalize the face. Its convenient before establishing the incidence of the light to locate the main view of the figure to adequate the light focus to that view.

How to Paint Faces - Tutorial

Once illuminated and shaded the face has a too uniform aspect to seem real (independently of the used color). By applying additional tones we will cause that the face takes realism and in addition we will be able to give depth or to heighten volumes alternating cold colors and warm colors.

Manipulating volume

The theory is that the warm colors tend to heighten a volume, to say it somehow, to push it towards outside. On the contrary the cold colors give to sensation of depth and/or concavity. If we have this in mind its easy applying glazes of cold and warm colors to heighten the reliefs of the figure. Here you have a small example.

How to Paint Faces - Tutorial

Once we learned this it’s necessary to assimilate what we have learned and not to directly associate prominent parts with warm colors and parts sunk with cold colors. The good thing of this technique is that indeed it helps us to emphasize volumes and to make hollows deeper but also allows the opposite. If we have an unwanted volume we can apply the cold tone to disguise a protuberance and the warm tone to minimize a depression.

The perfect example is the figure of Lyssete, 28mm of Reaper Miniatures. It is a precious miniature that aside from having the typical Werner Klocke face has a noticeable cheekbone. I’ve selected a few photos so that you can see it for yourselves.

How to Paint Faces - Tutorial

How to Paint Faces - Tutorial

How to Paint Faces - Tutorial

The challenge is in countering the hard gesture that has modeled the figure. In order to obtain it in this case I have used orange colors (my dear German orange) around the cheekbone, that in a normal figure would intone in cold color to mark it. Doing so I have been able to disguise a little the deep hollow that existed.

Later the challenge is in being able to disguise volume that it leaves downwards from cheekbone and that it is so ugly in a feminine face. In this case I need to “sink” the zone but I cannot use blue or green colors since probably they would give a sensation of a beard. I decided to use fucsia color to cool it. This tone does the function to me of cold tone and a similar color with the one of a feminine cheek with slight make up. Therefore using it to make up the eyelids will give me coherence to these tones.

Here you can see the result.

How to Paint Faces - Tutorial

How to Paint Faces - Tutorial

The mini is still unfinished but I believe that the effect can be seen. As always all the questions will be welcome and serve so that everybody understands it better.

—Morsi

How to make Autumn bases

Long time ago we had an active member of our forum, whose name was Micha (better known as Jaycan). Back then he made a cool set of Autumn-themes bases for his miniatures, and (what’s even better) described the whole process. So here goes his description:

Hello!
I have made some bases in Autum style. I used the following materials:

Photo: Autumn bases - Tutorial

I created some stones from FIMO and used 3 different kinds of sand:

Photo: Autumn bases - Tutorial

Then I painted the whole thing in black first.

Photo: Autumn bases - Tutorial

Then I drybrushed the sand with various browns and painted the stones with various red-browns, and finished with Bleached Bone and some metallic medium to get the effect of quartz crystals.

Photo: Autumn bases - Tutorial

The next step was the static grass…

Photo: Autumn bases - Tutorial

… which was later varnished and painted after drying and drybrushed with a mixture of different greens and Bleached Bone and yellow

Photo: Autumn bases - Tutorial

Photo: Autumn bases - Tutorial

The next step was to add some leaves – painted with different brown, red and yellow colors

Photo: Autumn bases - Tutorial

The last step was to put on some wood, because if there are leaves – there must also be wood.

the finished base looks like this:

Photo: Autumn bases - Tutorial

And here are some pics of six such bases:

Photo: Autumn bases - Tutorial

Photo: Autumn bases - Tutorial

I hope it’s helpful 🙂

greets

— Micha

“C’mon baby, light my fire!” – OSL tips

One of the most mysterious and impressive techniques used in miniature painting is the enigmatic OSL, which translates to On-miniature Source Lighting. Whether you like it or not is a matter of personal preference, but why shouldn’t you learn how to use this technique? These tips may be useful for this purpose.

I wanted to explain my way of painting light on miniatures. On our forum we had a discussion about Ana’s spellsinger, and it inspired me to writing this article.

General OSL tips

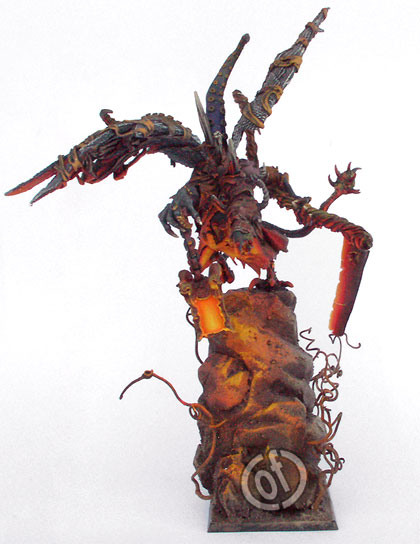
The way of painting light will be explained using my Demon of Chaos for the example. To begin with, we’ll remind several technical things that everybody should know:

  • The closer to the light source, the stronger the light, and the shadows too.
  • One needs to know what kind of light the source casts: fire – red/yellow, lightbulb – whiteish, etc.
  • We’re painting only these fragments of the mini, on which the light would fall in reality.
  • The best method of learning this technique is looking at reallife examples or works of other artists, and the metohds of trials and errors. Usually only experience and practice can show you how it’s done, so I am not teaching you any “success guaranteed” method, but only giving you some hints which can be useful.
  • Light looks different on different surfaces, eg. leather, metal, porous surface, or smooth surface. On a cloak or other fabric the light will remain matte (check the torn clothes on the demon’s front), while on metal the light would “slide” on the surface (the demon’s weapon).
  • Weak light will make weak intensity of the effect, small small reflections, it doesn’t reach far. On the other hand strong light source casts much light, and has better range. It’s up to you to decide on the intensity of the color and its luminance. And the intensity and luminance define the what the reflections will look like and how far from the light source will they be.
  • The further from the source, the bigger radius of the light, but lower intensity.

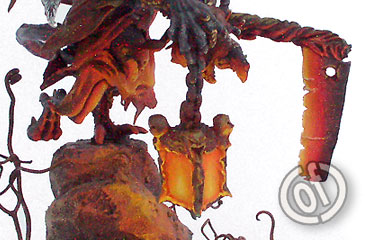
Photo: OSL tips - Tutorial

In my humble opinion it’s best to start with painting the mini in any way you like, and only then apply the light and shadows. More work will be needed, but the effect will be better (I know it from my experience). If we start with painting the effect of light, we can en counter various surprising problems, and they will not help us for sure…

Maybe not a step-by-step OSL tutorial

When the mini is painted, we can start painting our light. We’re starting with painting the light source (in this case – from the lamp), which will be helpful when we’ll be painting the reflections.

I started with the darker colors, and I worked toward the lightest point (Fiery Orange, Golden Yellow, Sunburst Yellow, white). We’re keeping the transitions smooth. The reflections can be made with glazes, which will create the natural effect of light falling on the surfaces.

Photo: OSL tips - Tutorial

As for the reflections, we’re starting with the surfaces positioned close to the light source, where the reflections will be stronger (the demon’s stomach and head). One can start with a darker color (eg. Blood Red) and mark the places where the light would fall on the whole mini, which will allow us a more complete view of the whole project.

Using glazes for the large surfaces we’re applying successive layers, until the effects satisfies us, but let us keep the color darker than the light source. Glazes will be no good for smaller elements, because thinned paint can run into recesses, etc. And that’s how we paint all the lit surfaces.

The last thing you can do, if there is such need, is making the surfaces opposite to the lit ones darker. I can give you another advice: the reflections near the light source will connct with shadows in a more rapid way: much light – much shadow (eg. the demon’s head). The farther reflections will have more delicate, subtle, and smooth transitions into the local color and then into the shadow (eg. the demon’s tail and tentacles).

And then we can use the same method for the miniature’s base 🙂

Rocky seashore bases by Demon Color

Years ago Demon_Color used to be a member of our team. At that time he described the way he created the seashore base, which he used for his mounted High Elf hero. If you want to see how to create such a base – keep reading…

Step one: Preparations

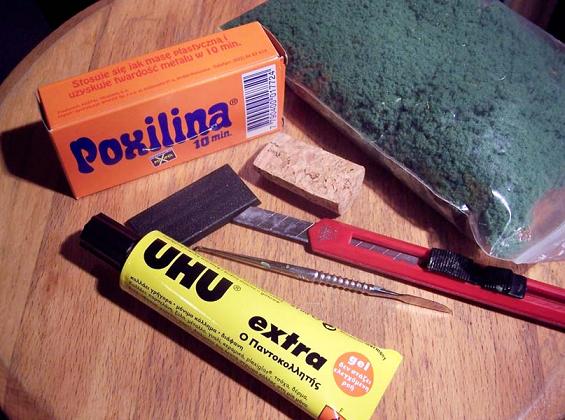
We need to acquire the following marterials:

  • the base (the most important thing ;))
  • cork (even from a bottle of wine)
  • Poxilina (or some other fast-curing putty)
  • glue (doesn’t need to be the one I used, even white glue will do)
  • static grass (or some other kind of grass used for making dioramas)
  • modelling tools

Photo: Rocky Seashore Base - Tutorial

Step two: The rock

Now we’re taking the cork (which can come in different shapes) and model it with a modelling knife to the shape we want for our rock. We tear the edges a bit, to make the rock look even more like a rock.

Our rock can’t cover the whole base, because we want to sculpt some sea waves on it, too. I suggest to make the rock on 3/4 or 3/5 of the base.

We glue the modelled cork to the base.

Photo: Rocky Seashore Base - Tutorial

Step three: The waves

Now we get down to modelling the sea waves. We cut off a 4-5mm thick block of Poxilina, and mix it until the colors blend with each other. We attach it to the part of the base, where we wanted the waves to be, and model it with a dentist’s spatula/ carver or a modelling knife.

Our moves have to be quick and firm. We need to remember that a wave hitting ricks is something undefined. Use your imagination (but don’t exagerate, because there still has to remain some room for the mini ;)). Poxilina is cured after some 10 minutes so you have to hurry and work quickly. 🙂

Photo: Rocky Seashore Base - Tutorial

Step four: Painting

Now that we have everything modelled (and our hands washed after working with this toxic stuff) we can start painting.

I suggest using the following paints for this purpose:

Water: GW (Midnight Blue) – (Midnight Blue + Ice Blue) – (Ice Blue) – (Ice Blue + White) – White

Rock: GW (Bestial Brown) – (Snakebite Leather) – (Vomit Brown) – (Bleached Bone) – (White)

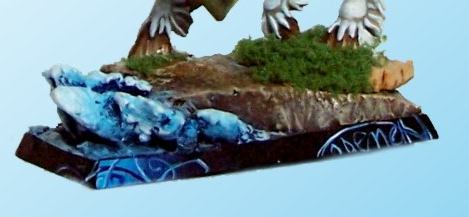
Use drybrushing of course 🙂 But for the waved I would suggest wetbrushing, and a lot of paint. If you feel like wetbrushing the rock, you are free to do it 🙂 I would even recommend it for better effect.

Photo: Rocky Seashore Base - Tutorial

Step five: Finishing touches

So we’re finishing our work. 😀

Now we only need to attach the mini to the base and to sprinkle some grass over the rock.

And don’t paint these patterns because they’re my trademark 😉

Photo: Rocky Seashore Base - Tutorial

— DEMON COLOR