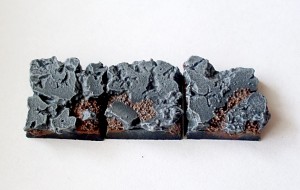
How to paint ruins bases – tutorial

In this tutorial explaining how to paint ruins bases from Micro Art Studio, I’m going to show you two of many possible colour schemes which you can use while painting ruins – first one will be with standard grey colours, like if you’re in some sort of castle (and later on I’ll call grey bases “castle bases”), and the second one will be “desert ruins” – some kind of old temple/church, once great, now forgotten. So, without any more introductions, here we go:

How to paint ruin bases: The ground

Step 1:

First thing you need to do, is basecoat your bases. I did it with Vallejo 950 Black, just because I ran out of both Citadel paint and spray:

How to paint ruins bases - tutorial (1)

Step 2:

So, now what to do next… Which part, which element now? Well, first thing you want to ask yourself, is: How much time do I want to spend on 1 base? Is it 1 minute? Maybe 5? Can I spend 20 minutes on 1 base? And, most importantly, will it be worth that time?

Well, let’s assume that we want to do it fast, without going back to destroyed elements, because we must do 200 of them. In that case I suggest you to make the deepest parts of the base – in this particular case, the earth. I used Citadel brown colour Mournfang Brown, old Bestial Brown, which I applied normally on specific parts. Remember – you don’t have to be precise at this part, so don’t waste your time trying not to paint stones:

How to paint ruins bases - tutorial (2)

Step 3:

After that step was done, I decided that I’ll create some shadows on the earth, to make deeper parts darker. I could just drybrush those parts where the earth should be brown instead of painting it, leaving black shadows everywhere – but I want dark brown shadows, not black.

That’s why I decided to use Citadel Agrax Earthshade shade, which I applied on brown parts. The same effect I could accuire using darker brown as a prime earth colour, and then drybrushing those parts with Mournfang Brown – pick your favourite method:

How to paint ruins bases - tutorial (2)

Step 4:

Next thing to do is light up the earth a bit – I mixed 1:1 Mournfang Bown and Citadel Ushabti Bone, and then applied it on brown parts with light drybrush:

How to paint ruins bases - tutorial (4)

Step 5:

To finish up the earth, I lightly drybrushed every brown part with pure Ushabti Bone – remember, make sure your brush is really dry, otherwise you’ll ruin the whole effect! It’s better to mix or even waste more paint that do everything from the beginning:

How to paint ruins bases - tutorial (5)

Step 6:

As the earth is done, we can go on. Next and last, in this particular case, thing we have to do, is paint stones. At this point I separated bases – 3 for grey bases, 2 for desert ones. From now on, we’ll split the tutorial into two parts – one about each kind of bases.

How to paint grey ruins bases

Step 7a:

While painting the earth you didn’t have to care about precision – now you have to. Especially near the painted brown earth. So I applied very gently 1 layer of Citadel Eshin Grey paint. I think that it’s the second darkest grey colour they offer, comparable to Mechanicus Standard Grey, which you can also use here. That’s how it looks (notice that we don’t care about the rims of base at all right now):

How to paint ruins bases - tutorial (7)

Step 8a:

After painting it with your favourite grey colour, I mixed 3 parts of Eshin Grey with 2 parts of Ceramite White, and then quite heavily drybrushed the whole base (but be careful, don’t destroy your beautiful earth!):

How to paint ruins bases - tutorial (8)

Step 9a:

Next step is to light it more – you can mix 2 parts of Eshin Grey with 3 parts of Ceramite White, or simply use colour named Administratium Grey. It will look pretty much the same.

Then again, drybrush the whole base – but now lightly. Pick your way with that – I decided that I’ll make sides of the base lighter. You can choose differently:

How to paint ruins bases - tutorial (8)

Step 10a:

The only thing to do now is to make one, final highlight – take your white paint and apply it very gently using drybrush on parts which were before treated with Administratium Grey. At this point, after you finish with white, you’ll also have to paint rim of the base with black colour – Abaddon Black from Citadel or any other black paint (like my 950 Vallejo black). And after doing so, your bases are done.

Here’s the final effect:

How to paint ruins bases - tutorial (9)

Let’s move on to the desert bases.

How to paint desert ruins bases

Step 7b:

Let’s move on from the common part about painting ground, as parts from basecoating up to fully painted earth are the same in both cases. Here again, while painting the earth you didn’t have to care about precision – now you have to. I used Citadel Tallarn Sand as a prime colour for those stones:

How to paint ruins bases - tutorial (10)

Step 8b:

Then I came up with an idea – why do I have to make it look like just plain stones with highlights, can’t I add anything catchy, something that will make my base special?

Well, if it’s old ruined temple why not some frescoes? You can make them as you want, with many colours or very few, big or small, untouched or very destroyed, simple patterns, complicated or just some letters. I made a simple pattern on the side of base – line of purple(Citadel Xereus Purple) and turquoise (Citadel Sotek Green) triangles accompanied with blacklining:

How to paint ruins bases - tutorial (11)

Step 9b:

As for something that is destroyed (in my case), frescoes also have to in bad shape. That’s why I “scratched” some frescoes paint from the edges of the base, and made some cracks inside the painting. After that, I used Citadel Seraphim Sephia shade to make shades all over the base (I skipped the earlier painted earth of course):

How to paint ruins bases - tutorial (12)

Step 10b:

Ok, frescoes are destroyed, bases have shading. Let’s move on a little bit, and start lighting things up. Before you’ll grab a brush, think for a while – how I want my base to be highlighted? Centre of it, just edges or maybe some other pattern?

I’ve decided to highlight edges and a little bit of centre of my base.

I used mix of 2:3 Ushabti Bone and Tallarn Sand, and then drybrushed the whole base lightly. Remember, you should also drybrush frescoes, but do it gently, otherwise you’ll ruin the whole effect by covering them fully:

How to paint ruins bases - tutorial (13)

Step 11b:

Then I reversed proportions, and made a mix of 3:2 Ushabti Bone and Tallarn Sand. After that, I heavily drubrushed the area of stones and very lightly frescoes:

How to paint ruins bases - tutorial (14)

Step 12b:

And at the end, I drybrushed whole base lightly with Citadel Ushabti Bone and painted the rims of the bases with black. That’s the end of making desert bases, here’s final effect:

How to paint ruins bases - tutorial (15)

Finished ruin bases

And so, here it is, the final effect of my work on 1 picture. A perfect bases for your Dwarf, Empire, Tomb King or any other army you want, which you can easily make by yourself in a matter of minutes!

How to paint ruins bases - tutorial (16)

List of used paints

  • Abbadon Black, Vallejo 950 – Basecoat, frescoes blacklining
  • Mournfang Brown – color of the earth
  • Agrax Earthshade – Shade used on earth
  • Ushabti Bone – Highlights on desert bases and earth
  • Eshin Grey – Prime colour for castle bases
  • Administratium Grey – highlights on castle bases
  • Ceramite White – Highlights on desert and castle bases
  • Tallarn Sand – Prime colour of desert bases
  • Seraphim Sephia – Shade used on desert bases
  • Sotek Green – frescoes triangles
  • Xereus Purple – frescoes triangles

– Lemartes

Painting Hell Dorado Immortals warband – Tutorial

Welcome to the article devoted to painting a whole warband. I will try to give you a step by step photo report. And the main actors will be Immortals from Asmodee/Cipher Studios.

Stage 1: Know your models

So we spent few euro or dollars, bought some cool looking models and it is time to have a good look what did you get. Maybe there are some parts missing? Maybe there are some miscasts?

If everything is ok, then now is the last call to have an idea how to paint the warband. What theme or background story? What color scheme? What units? What bases?

In my case the answers are no theme, original red-gold scheme, all units, Scibor‘s bases. It makes putting such group easier when there is a clear idea in your head. I know I am not being original, but this is also a decision later to stick to. 😉

So I take a good look at all the miniatures and put in separate piles. I try to, without glue, put these together and see if the parts match. Now is the perfect time to think about conversions and to look for extra parts in your bits box. If you found something there, just put it on the pile.

Stage 2: Removing mould lines and putting models together

Those models are supposed to fight on the table and we all know what happens to them when transporting or falling over on the table. That is why I try to pin the parts together. Tools that I use:

The pins which will hold the parts together are done (or better cut) from paper clips:

There should be also a picture of super glue or any metal glue, that glues the metal parts in few seconds. 🙂

A word about mould lines… I hate them! To clean them, takes a lot of time, but I see no other way. This job takes plenty of time, but it is simple. Believe me, it is worth to clean the miniatures from them. Later they will take a lot of the miniatures’ beauty away. I spent 2 evenings to clean all the parts from mould lines, but this job needs to be done – even on tabletop miniatures! Now, when all the parts are separate and easy to reach, it is the best time to remove them. Later it will won’t be easier. 😉

So let’s move to some examples – this djin has be cleaned from mould lines and all the parts are together (so that I won’t forget anything).

First I try to glue the biggest parts, in this case it is the torso. You can see on the picture a small cut from pater clip (called a pin) and two holes (drilled by me) in both parts of the torso. Before you glue – try to pin the parts without glue – if it’s ok, put some glue on the parts and into the pinning holes. If not then maybe the pin is to long or the holes too small?

To be sure that you drill the holes in perfect positions on both parts, try this simple trick:

  1. Drill a hole in one part,
  2. Put some paint around the hole,
  3. Try both parts together (with your fingers, not glue),
  4. Remove the second part and you should see the exact place where to drill.

And there we have a finished cleaned and pinned djin.

While removing mould lines from a ‘froggy warrior’ I accidentally broke the lance into two parts. It happens quite often, when the parts are small and fragile.

So what did I do – first I finished removing all the mould lines:

… and drilled holes in both parts and pinned them:

I also had a bit of problems with glueing the small parts with the torso, but with the help from pincette it was much easier. Here are the horns that are supposed to go on the shoulder pads:

I stick glued and pinned models together on cork. It makes further steps, like cleaning/gap filling/painting, much easier. You can easily rotate the cork and not touch the miniature. Another benefit is that when you clean the miniature (more to come), it won’t get dirty or greasy from fingers.

At the end of this step we get something like this:

Stage 3: Preparing for painting

All miniatures are on cork, waiting to be painted. Before we go to this step, there are some more things to be done. Usually glued minis have gaps, holes that don’t look nice. With these tools I will fill them:

Here is a mercenary djin with filled gaps.

I must admit, that using liquid green stuff from Games Workshop helps a lot. Filling small gaps isn’t a problem, but sometimes the gaps are too big, just like here:

The best way is to use normal green stuff or any other putty.

Now we are almost ready with putting undercoat, almost… We were touching the miniatures with dirty hands and the miniatures need a wash, so that the undercoat spray will hold on the miniature better. It will also remove any fat or oils from manufacturing process. We just need an old tooth brush, soap and dish washing liquid.

Pour some hot water and gently wash the miniature. I had no problems will super glue losing its characteristic because of water, so I can say it is safe!

Stage 4: Priming

Give the miniatures a day or two to dry and now we can finally prime the miniatures. This time I have used the Tamiya grey primer:

The from a distance of 30cm I spray each miniature 3 times:

[list class=bullet-2]

  • from each side (vertically)
  • from top (from each side)
  • from below (from each side too)
  • I just hate when later there are some not covered places on a miniature and the paint doesn’t stick.

    And there you have it, now we can finally start to paint the Immortals. You may think and say that it is way too much for all those steps before painting. I think it is worth to spend 2-3 evenings longer to have no problems later.

    Stage 5: Painting human skin

    It is important to plan the painting on all miniatures in a band. I thought the best option will be to paint the biggest areas first. That is why I started with human skin.

    Step 1

    First I’ve created a base color:

    [list class=bullet-2]

  • pink 10%
  • Bronzed Flesh 20%
  • white 10%
  • Elf Flesh 60%
  • You might wonder why a bit of pink. 🙂 Well it is because in my opinion it gives a more natural look and makes the skin look more interesting. The paint was diluted 1:1 with water, so I had to cover the skin twice with the base color.

    Step 2

    Then I gave the whole skin a wash of Ogryn Flesh and Devlan Mud in the deepest shadows.

    Step 3

    When the washed surface was really dry (I waited about 30 minutes), I covered the muscles with the base color plus I added some more white to the mix.

    Step 4

    For the final highlight I mixed 40% base color with white.

    Stage 6: Painting the creature’s skin

    Step 1

    Once again I started with making a base color:

    [list class=bullet-2]

  • Hormagaunt Purple 20%
  • Elf Flesh 40%
  • Menoth White 40%
  • There is only a small bit of purpule, but it is very visible. It is because Hormagaunt Purple is a foundation paint and those have much more pigment in it.

    Step 2

    Leviathan Purple wash and a bit of purple + black wash in those deepest shadows.

    Step 3

    Just like with the human skin, I highlighted the muscles with base color.

    Step 4

    Top places were highlighted with 50:50 mix of base color and white.

    At this stage I think I can say I am 25% done. 🙂 That is the biggest advantage when choosing the correct order of painting – you get the results fast and you stay motivated. 🙂

    Stage 7: Painting the red clothes

    Now we come to the best part, well in my opinion, painting the red parts. I know an easy way how to paint good looking reds and now I will share my secret with you. 😉

    The secret is simple when it comes to red, there are two important things:

    1. What color is under the red,
    2. Don’t highlight the red, just darken it.

    Step 1

    As always I make a base color mix and cover the whole parts:

    [list class=bullet-2]

  • Blood Red 30%
  • Scrab Red 50%
  • Dark Flesh 20%
  • Step 2

    To the base color I add more Blood Red and pink.

    Step 3

    For the final and brightest highlights there is just Blood Red & white.

    Step 4

    Now comes the most important part. Paint pure Blood Red diluted with water, on all those highlighted areas. Do you now see the richness of red color?

    Step 5

    To make the red looking more interesting and more contrasting. I did a wash with Blood Red wash, a bit of black, purple, Scorched Brown and dark blue. Wash the deepest areas with this mix.

    This technique seems to be very intensive, but as you can see on the pictures you don’t have to be that accurate most of the time. 🙂 Even though it is very simple, I find it excellent for table top painting.

    So now the Immortals warband is 50% finished.

    Stage 8: Bases

    As already mentioned for the bases, I have decided to buy them from Scibor Miniatures. First of all they were cleaned and washed in water and soap. To save a bit of the money I bought a set with only heads. Seven bases I did on my own, trying to keep them similar to the ready ones, using just those heads, cork and sand.

    To make basecoating and painting easier, I wrapped a bit of adhesive tape on a piece of plastic. You can also buy a two side tape, that makes the whole job much easier.

    Everything was basecoated, and since I ran out of the grey primer, I had to use black one. 🙂

    Citadel Foundation brown paint was used to paint the ground.

    And the I just highlighted the earth with Bleached Bone by drybrushing.

    The stones were base coated with Citadel Foundation grey.

    Then I drybrushed it with Codex Grey.

    Another drybrush with Games Workshop‘s Space Wolves Grey

    The last stage was to drybrush with pure Skull White only at some of the most visible places.

    The flowers were painted green and dry brushed with yellow, some static grass was ‘planted’ and the rims were painted dark brown:

    Stage 9: Painting white

    Because the miniatures were primed with grey, I didn’t have much to do here. This is how they looked after priming:

    Then I heavily diluted the Games Workshop‘s Codex Grey with a bit of blue to make a wash:

    After that I just highlighted with white:

    Stage 10: Painting metallics

    I already told you, that I paint in a way to cover the biggest surfaces first. After painting the skin, reds and white now is the time to paint some gold and silver. I was painting them together at the same time.

    For gold I first used Games Workshop‘s Shining Gold and washed it with Gryphone Sepia:

    Then with Burnished Gold I highlighted the most visible scales on the armour and shoulder pads. For the silver parts I have used Chainmail Silver.

    The silver parts were light lighted with Mithril Silver.

    Then the silver was washed with Badab Black wash.

    And again with the same wash. 🙂 Just to make the silver look older.

    Then while I was painting the ethereal smoke, I came up with an idea to make the metallics look more interesting and break the color. I painted small areas with very diluted Scaly Green to make patina.

    As you can see, the miniatures are already 90% done!

    Stage 11: Painting ethereal smoke

    This one also goes really fast. First wash the smoke/cloud with grey.

    Then comes a wash with a mix of Scaly Green and Scorpion Green. That mixture goes into the deepest areas. At this stage if you would like the smoke to have different color, i.e. purple, you could mix some other paints.

    At the very end with white paint I just highlighted some areas to make the contrast stronger.

    And that’s it…

    Because of the batch painting the war band was fully painted in 3 months. In case I didn’t paint every evening, so it is possible to finish them in much shorter time.

    I already hear you asking – what about not painted parts? Well those parts were painted just using one paint only. The painting colors were really simple:

    [list class=bullet-2]

  • hair – Chaos Black, drybrush with Codex Grey
  • sticks – Scorched Brown
  • shoes – Bestial Brown
  • leather strips – Gore Red
  • The point was to have a painted war band in a very short time, that is why I tried to focus on the biggest and most visible surfaces.

    Now it’s time for some final photos.

    Finished Hell Dorado Immortals

    My both Hell Dorado armies together:

    Please give me suggestions how to show, explain things better. Everything that could make such articles more interesting and informative. Ask many questions, tell me if I didn’t explain something clearly.

    Thank you for support. 🙂

    — Sea.man

    About driving and contrasts in miniature painting

    What can driving teach you about painting miniatures and improving contrast in your paintjobs? Let me tell you about an interesting experiment that I read about:

    The experiment

    Drivers were asked to drive at a constant speed of, let’s say, 60 km/h. Then they were supposed to speed up quite much – to 150 km/h, and then to slow down to 60 km/h again but without looking at the dashboard. Now what was the result?

    About driving and contrast

    Most drivers slowed down only to 80-90 km/h, yet they felt they were driving at 60 km/h already. Their senses got so accustomed to higher speeds, that their perceived level of “normal speed” increased.

    I had a very similar feeling today. After driving fast for some time I had to slow down to 50 km/h and when I checked the dials of my car, I noticed it was not 50 but 70 km/h. You must know the feeling too…

    But how to apply it to miniature painting?

    The common complaint

    When you browse dozens and hundreds of miniatures presented by painters looking for feedback, you will surely notice that a common problem is that their paintjobs look boring, monotoneous. So the commonly offered piece of advice is “more contrast!”. But what you hear in return is “the paintjob is contrasted enough already”.

    So what’s the deal? Is it that the painter doesn’t want to hear criticism and advice, or maybe they cannot see what’s wrong?
    Usually it’s the latter. But there’s an easy trick to make them see!

    Pandadosmares’ story

    You surely recognize Pandadosmares from our miniature painting forum. This Portuguese painter kept receiving the same advice and no matter how he tried, he couldn’t get it right. And then he came to Poland to Hussar 2010. This gave him a chance to see works of other miniature painters and what he realized was that regardless of his previous convictions, the contrast of his works was still insufficient.

    This live demonstration allowed him to make progress in his hobby again, after some time of experiencing a problem with making any improvements. One of his repeating comments after the contest was that he was surprised how strong contrasts were used by better painters. And the kind of contrast we mean here is not using contrasting colors, but strong chiaroscuro – deep shadows and strong highlights. And no, the contrast doesn’t have to be abrupt, it can be smooth – it just helps emphasize the sculpt.

    Sculpting with light

    One phrase I picked up from Ana is that painting is a lot like sculpting with light. And this is true: miniatures are small, so natural chiaroscuro is not very intense. If you exaggerate it a bit with your painting of lights and shadows, you will make the miniature more dramatic, more interesting and more eye catching.

    Now think, which version of this paintjob looks more eye catching? Not realistic, but more interesting:

    How to increase contrast
    No, these are not to different paintjobs on the same model. It’s a digital simulation only, but it gives some idea, doesn’t it?

    I used a picture of one of my older works. Now imagine you see them both on a gaming tabletop or in a display cabinet. Which one catches your attention easier? And on the second look, you pay attention for quality of the paintjob, but that’s another story…

    So you want to do a little exercise?

    Speed up and then slow down!

    Remember the experiment from the beginning of this article? After driving at high speed for some time, drivers had altered perception of what normal speed was. When they slowed down, they thought they were actually driving slower than they really did. Why not try it with miniature painting?

    So do it in a few simple steps:

    1. Assume that the level of contrast you actually use is your normal contrast level.
    2. Take a new miniature. Not necessarily a valuable one, it can be something as common as a simple plastic goblin. It’s just a subject for the exercise.
    3. Now paint it with extreme contrast, and by saying extreme I really mean it. When shading – shade to black. When highlighting – go up to white. As I said before, no need to do it abruptly – if you enjoy smooth blending, keep your style. Just be extreme with your highlighting and shading.
    4. The miniature is painted. It looks exaggerated and cartoonish, doesn’t it? Probably not very realistic, but when placed in a display cabinet it would attract attention, at least from distance, wouldn’t it? Now you’re driving at high speed, so to say…
    5. Do you feel comfortable with the “speed” already? If you do, move on to the next step. If not – maybe you should practise a bit more, paint another miniature this way? You’re not doing this exercise for us, but for yourself!
    6. Now slow down and return to your normal speed. Oh wait, I didn’t really mean driving but painting 😉 I meant returning to your normal level of contrast. Paint a miniature with your normal level of contrast now.

    And what do you think? Did your perceived level of contrast you were comfortable with shift, just like the level of speed shifted for the drivers?

    How to increase contrast
    And again I used my old paintjob to depict what the whole exercise is about…

    The exercise can be repeated once in a while. Whenever you feel you would like to push yourself a bit further – give it another go.

    Results? Shifted “normal” contrast level

    I am curious if this method worked for you. Why don’t you share your results with us and discuss the method in the comments or on our forum?

    No, we’re not saying you should be only painting exaggerated highly contrasted paintjobs now, not really. It was only a tool to solve the situation of being unable to push your contrast that one step further and becoming comfortable with it. Just another tool in your miniature painting toolbox.

    I hope this post was helpful or at least inspiring for you. 🙂

    — Mahon

    How to make a ‘Scavvy bunker’ photography background

    Hello all!
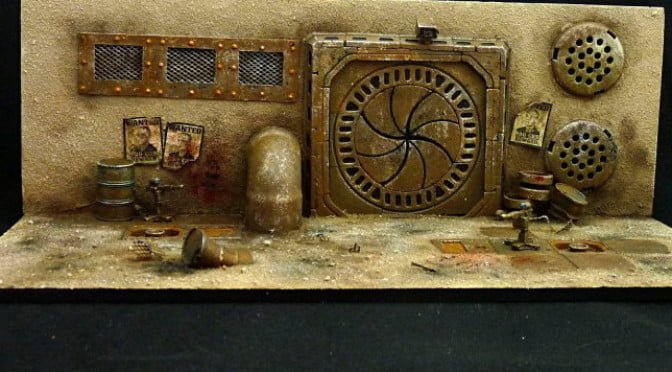
    It’s been a while since I managed to prepare something worthy publishing but sadly when life issues strike – there’s no other way than face them. Fortunately I had a short break from the life recently during which I managed to slap paint over some minis, play some Necromunda matches and of course: write this short walkthrough explaining how to build a Scavvy bunker which I use as my photography background.

    Crucial question: What for?

    The first question about the project should be: what for?
    After ~15 years in the miniature wargaming I realised that although fancy studio pictures of miniatures are very nice what REALLY makes me want to get some new toys is watching the precious models in the action. Nicely painted models placed on nicely prepared battlefield is something just stunning. I still can see beautiful Warhammer Fantasy armies from the battle book and Warzone corporations from Mutant Chronicles zine.

    Therefore last year I started building modular gaming board worthy of our miniatures (and Necromunda campaign of course) but because my hobby time is limited and the table is rather big (work in progress aerial pic below) the decision was made to prepare small piece of terrain and paint it the way I want to see the battlefield one day. I was bored using printed backgrounds for taking photos so this small display piece should fix my problem.

    How to make Scavvy bunker - photography background (21)

    How to make Scavvy bunker - photography background (22)

    How to make Scavvy bunker - photography background (23)

    Preparations

    The base was planned big enough for about dozen miniatures. I grabbed thick PVC sheet and cut ~5″ x 11″ sheet. As for the back wall – it’s height was determined by size of the gate (about 4″) and spare space in my glass case.

    The gate

    It was cast using Hirst Arts molds – instead of recommended clay I used resin with solid amount of filler. This stuff makes casts “crunchy” and much more fragile (bad idea for mass production) but also easier to work with when it comes do sandpapering or drilling. Of course using clay will also work – just there’ll be a bit more mess on the hobby station.

    How to make Scavvy bunker - photography background (1)

    And here’s the assembled gate. All the edges were treated with sandpaper so it’s easier to install into the frame.

    How to make Scavvy bunker - photography background (2)

    Once again I used molds to cast the frame – not much more to write about here.
    The green slime is test of colors I was going to use for tox bombs – never let Scavvy boss out into the combat zone without supply of this nastiness!

    How to make Scavvy bunker - photography background (3)

    And here’s the gate confronted with the back wall. As you can see there’s another frame around the gate. If I remember correctly all these cool parts can be found in the single sci – fi mold.

    How to make Scavvy bunker - photography background (4)

    The entrance is done and inserted into the hole cut in the wall. The excessive bottom will be cut off and smoothed so it can be pinned and attached to the base.

    How to make Scavvy bunker - photography background (5)

    And here’s the general idea of some bits to be added: some floor tiles and some vents (made of headphones broken by one of my cats – thanks a lot Cruiser, you bastard…)

    How to make Scavvy bunker - photography background (6)

    More bits!

    The tiles have been placed into the prepared holes (don’t worry: wallpaper knife deals very easy with PCV sheet, almost as easy as blessed chainsword with heretic’s throat) and also some windows were added. To make the job as easy as possible I simply cut long rectangle shaped hole, covered it with thin PVC frame simulating windows (2mm PVC can be cut with scissors) and added some nails so I can paint rust around them in later stage. Bright rust should work as nice eye catcher especially on dark metallics.

    How to make Scavvy bunker - photography background (7)

    Another step was adding mesh into the windows – I really like such additions especially it looks really decent even if only slightly drybrushed and hit with some brown washes. The mesh was pain in the ass to work with and I had to use special shears to get desired shape. Hobby clippers definitely weren’t enough.

    How to make Scavvy bunker - photography background (8)

    Some more bits added to the junkyard.
    Also I attached another sheet of PVC to the back so you cannot see through the windows. Some metallics were painted as well (boltgun + black) – do it as fast and easy as you can, it’s just terrain piece so doesn’t need as much attention as models.

    How to make Scavvy bunker - photography background (9)

    And more bits – this time it’s the final re-arranging.

    How to make Scavvy bunker - photography background (10)

    Rusting!!! I meant painting…

    Like I wrote the piece was made to fit the battlefield concept: the gaming board is desert area (something inspired by Necromunda Ash Wastes) with some ruins and abandoned, corroded installations. This brings my fav way of painting (easy and effective that is): painting sand is almost pure drybrush while with a bit of practice you can paint huge chunks of rust really fast.

    The natural decision was to start with the rust because I didn’t want to see the mess on the sand. After whole metallics were painted I simply glazed them with different colors: browns, sepia, orange. Once the paints dried some chipped paint was added and also some shading. Details will be added later.

    How to make Scavvy bunker - photography background (11)

    The desert

    Base was covered with white glue (the stuff you use for wood or static grass) and sprinkled with sand and some gravel. I use the same sand and gravel on bases of my gangers so everything fits nicely. As for the colors – once again I decided to make my life as easy as possible. Sand was glazed with some heavily diluted brown / sepia just to give it some hue and enhance shadows. After that there was a bleached bone / white drybrush and some chalks for the final. I sprayed varnish over the base to attach chalk to the base. Turps also works fine but it’s pretty stinky and flammable so be careful with that stuff!

    How to make Scavvy bunker - photography background (12)

    The material I used to cover the back wall was the filler which I used for casting. It’s something like very fine sand. I didn’t use the same sand as for the base because I wanted to achieve different texture: more like concrete than sand or rock. Again: layer of white glue, layer of filler and voila!

    How to make Scavvy bunker - photography background (13)

    Painting the Scavvy bunker

    Painting wall was similar to painting base: glaze, drybrush and pigments. Also color choice was similar to keep whole thing coherent.

    How to make Scavvy bunker - photography background (14)

    Some scale shot – still work in progress…

    How to make Scavvy bunker - photography background (15)

    And the final: PVC edges were painted black, some more details added: turrets lenses, rust here and there, arch-villain posters, oil leaking from the barrels, blood splats. It’s a piece of battlefield, not some sort of Xmas tree so try not to get carried away.

    Finished photography background

    I must say I am really satisfied how the thing came out – I used similar colors on the Scavvies so these nasty bastards fit the base just fine. And if I ever get bored but this scenery I will just paint some oldie sci fi models (like Cartel agents from good ol’ Warzone), pin them into the base and put in the proper shelf in the display case.

    How to make Scavvy bunker - photography background (17)

    How to make Scavvy bunker - photography background (18)

    Hope you like it. For more of my stuff – just visit my blog or wait pariently for another text to be spawned.

    How to make Scavvy bunker - photography background (19)

    How to make Scavvy bunker - photography background (20)

    Cheers!
    — Demi_morgana

    Snow base in 10 simple steps – Tutorial

    Snow on bases! Yes, it’s great idea… but wait, I don’t have any “modeling snow” or anything like that. It’s not a problem for us. We can make a simple snow base in only 10 steps. Let’s go!

    What do we need?

    • cork
    • base
    • static grass
    • baking soda
    • vicol glue (PVA glue)
    • super glue
    • water
    • paints: Black (VGC), Wolf Grey (VGC), Skull White (GW)
    • old brush

    Snow base - tutorial (1)

    Step 1

    Glue a piece of cork to your base using super glue.

    Snow base - tutorial (2)

    Step 2

    Paint the whole cork Black. I used a brush for painting this one, but if you want to make more bases you can use an airbrush.

    Snow base - tutorial (3)

    Step 3

    Use the old brush.

    Snow base - tutorial (4)

    Drybrush your base with Wolf Grey.

    Snow base - tutorial (5)

    Step 4

    Drybrush your base with Skull White.

    Snowy base - tutorial (6)

    Step 5

    Use static grass and glue it with super glue.

    Snow base - tutorial (7)

    Step 6

    Now we have to make the snow. Put some vicol (PVA) glue on the plastic pad.

    Snowy base - tutorial (9)

    Step 7

    Add a few drops of water and mix it. You should have something with consistency of sour cream.

    Snow base - tutorial (10)

    Step 8

    Add some baking soda and mix it. If you are not satisfied, you can add more baking soda. Now you should have consistency of porridge for children. Add some skull white to gain brighter snow.

    Snowy base - tutorial (11)

    Step 9

    Put your snow on the base.

    Snow base - tutorial (12)

    Step 10

    Wait until the snow is dry. You can put the base under a source of light, for example a lamp on the desk. After a few minutes the snow is dry and you can put a mini on your snow base.

    Snowy base - tutorial (13)

    Finished snow base

    Snow base - tutorial (14)

    Simple, wasn’t it? And how do you make snow for your bases? Do you have any tips you would like to share in comments?

    — Rentall