

I continue to paint fantasy terrain accessories. This time I finished 3 resin columns from Secret Weapon Miniatures. Two of them are made as whole and one is in pieces. Thanks to airbrush, it was a fast painjob. After preshading I painted shadows with inks and highlighted the edges. In the end I could not resist to paint some cracks on them to break plain surfaces.

Here is a picture with 28mm miniatures for scale:

(click to see bigger photo)

Fantasy terrain stuff
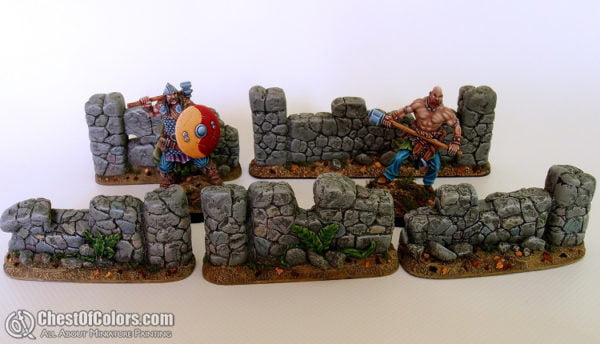
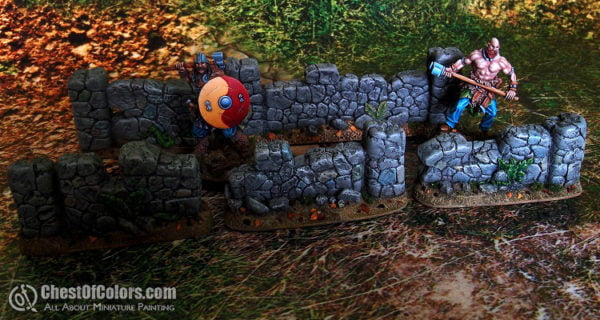
Here is something for fantasy gaming – resin walls from Ristuls Extraordinary Market that I bought some time ago. They’re part of their Old Stone Wall Terrain set. IMHO the walls could be a little higher, but overall they’re OK. Painted fast and easy way: base + wash + drybrush, but the effect seems enough for the stuff that is just a background for your minis 🙂
I’m rather poor photographer, so here are pics on white background and in more “natural” surrounding (game mat).

I also painted medieaval/fantasy shed made of resin (2 pieces – base with walls and roof). I don’t know the manufacturer – I bought it from second hand already primed. It had quite many air bubbles to fill, but once I did that, the painting was easy part. I used yellow and brown tones, suitable for wood and hay. After painting I put some static grass and various trash to make it look more natural.


The miniatures shown for scale are Red Box Games ones – they are closest to 28mm scale.
It was quite a fun painting something different than usual.

SF terrain stuff
Sometimes when you don’t have mood for painting figures, you can always paint some terrain accessories. This is how I did recently.
These terrain accessories are for Infinity, although they can fit any SF game.
The small boxes are made from spare elements that are left from resin models. After cutting and sanding they can be used as objective markers and gain second life. The larger container is made from Games Workshop WH40K imperal buildings floor (hence this skull) and plasticard.


These 2 cubic containers are made from laser cut 3mm HDF board (I don’t know the manufacturer). I enjoyed painting all those scratches and rust leaks 🙂


More Infinity terrain will come soon.
Tabletop World Review
As most of you know, I’m working on my Salamanders Army but some times ago, I decided to go back working on my Vampire Counts army, so I took a little break from marines. Not because I was bored of the Space Marines, but I think it’s always nice to have a change in what you paint to avoid breakdowns in the motivation.
Anyway, like on many forums, we have in ours a little section used for presenting all new releases from various manufacturers and one of our members posted a nice scenery from Tabletop World that was perfect for my Vampire Counts, ie, the Graveyard. Though, Games Workshop released their a few times before and since it was definitely cheaper than Tabletop World one (but not of the same quality of course), I got myself three models of it. But later, Tabletop World proposed to buy only the mausoleum and the tombstones, so this was perfects additions for the Games Workshop graveyard.
What you get for your money?
This shop proposes a few models in their catalogue, all sceneries or accessories for your sceneries.
Since I already had a bunch of Games Workshop graveyard, I chose to go for a simple mausoleum and a complete set of tombstones and since I really like Mordheim, I went for a pack of Supplies as well that would have gone perfectly on the table. Each set respectively costs 23 EUR, 20 EUR and 10 EUR. The mausoleum is a single building but the tombstones and the supplies set contain 37 and 13 items.
So basically for 53 EUR, you’re getting a nice amount of items. Shipping cost isn’t that expensive. For everything delivered to France, it cost me 13 EUR.


Casting quality
This shop wasn’t unknown to me and I already knew they were proposing buildings of a really good quality.
As you’ll see on the pictures, those are really nicely detailed and I was pretty amazed by the precision of the details on every items. Regarding the cleaning, I had nothing to do, didn’t noticed a single mold line or a bubble. The casting is really excellent.


Even though I didn’t have any casting issue (bubbles or mold lines), and that resin is of an excellent quality (similar to the one Spartan is using for their minis (you’ll find a review of Dystopian War product on our pages soon enough), it’s a pretty hard resin and most items are packed altogether in small bags so one of the wheel fixation of the cart was broken (though, easily fixed by gluing it back).

The only downside I found (cause I had to find one) was that like on the issue I had on my Dystopian Wars miniatures, the bottom of one item wasn’t perfect and thus, it wasn’t completely flat (again, since resin is hard, it’ll easily be fixed by sanding the bottom of the item).

Summary
Tabletop World is clearly providing an excellent quality of sceneries that’ll for sure fit on most of your table. They’re well cast, super detailed and are still not that expensive for the quality and quantity you’re getting.
I was really surprised when I ordered, cause there is no registering option on the website, you’re adding stuff to your cart, proceed to checkout, check for the shipping cost. Then, once you got everything, you’re redirected to PayPal (if you chose to pay with this solution) and you get a confirmation page saying your order has been processed and that you’re going to be redirected on the main page. Since I was a little worried, I poked them by email, because I wasn’t sure that my order had ended properly.
They answered the next day (which is pretty fast in my opinion) and they said that it was their process and that I shouldn’t be worried and a few minutes later, I received a confirmation email with my order. Around 10 days later, I received my order which was nicely wrapped and protected. All items were wrapped in cardboard and were nicely placed in the middle of the box surrounded by newspaper.
In my opinion, Tabletop World aren’t perhaps providing the largest catalogue like other companies who sells sceneries for tabletop gaming like Ziterdes, though, they do provide, a nice customer service (which is pretty hard to get these days), and really good products with nice casting quality considering the price ratio. I just wish they could change their checkout process because it’s a bit weird, but beside that, I do hope they continue like this while proposing some more models to their catalogue.

How to make a ‘Scavvy bunker’ photography background
Hello all!
It’s been a while since I managed to prepare something worthy publishing but sadly when life issues strike – there’s no other way than face them. Fortunately I had a short break from the life recently during which I managed to slap paint over some minis, play some Necromunda matches and of course: write this short walkthrough explaining how to build a Scavvy bunker which I use as my photography background.
Crucial question: What for?
The first question about the project should be: what for?
After ~15 years in the miniature wargaming I realised that although fancy studio pictures of miniatures are very nice what REALLY makes me want to get some new toys is watching the precious models in the action. Nicely painted models placed on nicely prepared battlefield is something just stunning. I still can see beautiful Warhammer Fantasy armies from the battle book and Warzone corporations from Mutant Chronicles zine.
Therefore last year I started building modular gaming board worthy of our miniatures (and Necromunda campaign of course) but because my hobby time is limited and the table is rather big (work in progress aerial pic below) the decision was made to prepare small piece of terrain and paint it the way I want to see the battlefield one day. I was bored using printed backgrounds for taking photos so this small display piece should fix my problem.
")
")
")
Preparations
The base was planned big enough for about dozen miniatures. I grabbed thick PVC sheet and cut ~5″ x 11″ sheet. As for the back wall – it’s height was determined by size of the gate (about 4″) and spare space in my glass case.
The gate
It was cast using Hirst Arts molds – instead of recommended clay I used resin with solid amount of filler. This stuff makes casts “crunchy” and much more fragile (bad idea for mass production) but also easier to work with when it comes do sandpapering or drilling. Of course using clay will also work – just there’ll be a bit more mess on the hobby station.
")
And here’s the assembled gate. All the edges were treated with sandpaper so it’s easier to install into the frame.
")
Once again I used molds to cast the frame – not much more to write about here.
The green slime is test of colors I was going to use for tox bombs – never let Scavvy boss out into the combat zone without supply of this nastiness!
")
And here’s the gate confronted with the back wall. As you can see there’s another frame around the gate. If I remember correctly all these cool parts can be found in the single sci – fi mold.
")
The entrance is done and inserted into the hole cut in the wall. The excessive bottom will be cut off and smoothed so it can be pinned and attached to the base.
")
And here’s the general idea of some bits to be added: some floor tiles and some vents (made of headphones broken by one of my cats – thanks a lot Cruiser, you bastard…)
")
More bits!
The tiles have been placed into the prepared holes (don’t worry: wallpaper knife deals very easy with PCV sheet, almost as easy as blessed chainsword with heretic’s throat) and also some windows were added. To make the job as easy as possible I simply cut long rectangle shaped hole, covered it with thin PVC frame simulating windows (2mm PVC can be cut with scissors) and added some nails so I can paint rust around them in later stage. Bright rust should work as nice eye catcher especially on dark metallics.
")
Another step was adding mesh into the windows – I really like such additions especially it looks really decent even if only slightly drybrushed and hit with some brown washes. The mesh was pain in the ass to work with and I had to use special shears to get desired shape. Hobby clippers definitely weren’t enough.
")
Some more bits added to the junkyard.
Also I attached another sheet of PVC to the back so you cannot see through the windows. Some metallics were painted as well (boltgun + black) – do it as fast and easy as you can, it’s just terrain piece so doesn’t need as much attention as models.
")
And more bits – this time it’s the final re-arranging.
")
Rusting!!! I meant painting…
Like I wrote the piece was made to fit the battlefield concept: the gaming board is desert area (something inspired by Necromunda Ash Wastes) with some ruins and abandoned, corroded installations. This brings my fav way of painting (easy and effective that is): painting sand is almost pure drybrush while with a bit of practice you can paint huge chunks of rust really fast.
The natural decision was to start with the rust because I didn’t want to see the mess on the sand. After whole metallics were painted I simply glazed them with different colors: browns, sepia, orange. Once the paints dried some chipped paint was added and also some shading. Details will be added later.
")
The desert
Base was covered with white glue (the stuff you use for wood or static grass) and sprinkled with sand and some gravel. I use the same sand and gravel on bases of my gangers so everything fits nicely. As for the colors – once again I decided to make my life as easy as possible. Sand was glazed with some heavily diluted brown / sepia just to give it some hue and enhance shadows. After that there was a bleached bone / white drybrush and some chalks for the final. I sprayed varnish over the base to attach chalk to the base. Turps also works fine but it’s pretty stinky and flammable so be careful with that stuff!
")
The material I used to cover the back wall was the filler which I used for casting. It’s something like very fine sand. I didn’t use the same sand as for the base because I wanted to achieve different texture: more like concrete than sand or rock. Again: layer of white glue, layer of filler and voila!
")
Painting the Scavvy bunker
Painting wall was similar to painting base: glaze, drybrush and pigments. Also color choice was similar to keep whole thing coherent.
")
Some scale shot – still work in progress…
")
And the final: PVC edges were painted black, some more details added: turrets lenses, rust here and there, arch-villain posters, oil leaking from the barrels, blood splats. It’s a piece of battlefield, not some sort of Xmas tree so try not to get carried away.
Finished photography background
I must say I am really satisfied how the thing came out – I used similar colors on the Scavvies so these nasty bastards fit the base just fine. And if I ever get bored but this scenery I will just paint some oldie sci fi models (like Cartel agents from good ol’ Warzone), pin them into the base and put in the proper shelf in the display case.
")
")
Hope you like it. For more of my stuff – just visit my blog or wait pariently for another text to be spawned.
")
")
Cheers!
— Demi_morgana