

Recenty I received my 3D Bases Modular Terrain from Manorhouse Workshop that I purchased through their Kickstarter campaign ended over 1 year ago. Time passes so quickly… Anyway, since I have those bases in my hands I decided to share my first impressions with you.
Each base is a square 30 x 30 cm (approximately 12 x 12 inches) and is designed to be used with miniatures in the 25-35mm scale range. They are made of rubbery material – after being bent or squeezed they regain their original shape. This means that they should not be damaged easily. I will not test them too violently in case they nevertheless happen to break 🙂
I ordered total 18 bases, which allows me to build 90 x 180 cm terrain. That occupies the whole table! I did not have place to present them all at once, but here are just 6 Abbey bases building 60 x 90 cm wargame terrain:

(click to see bigger photo)
Since the bases are square, even a few of them can be put in almost endless combinations. This allows to build many different sceneries.
There are some little miscasts caused by air bubbles durring casting process, but this is nothing that cannot be fixed with some Green Stuff. I noticed those imperfections only on the most elaborate bases. More flat ones are cast perfectly.

The material can be painted and I plan to paint and show you finished examples quite soon. Maybe I will even make step-by-step painting article 🙂
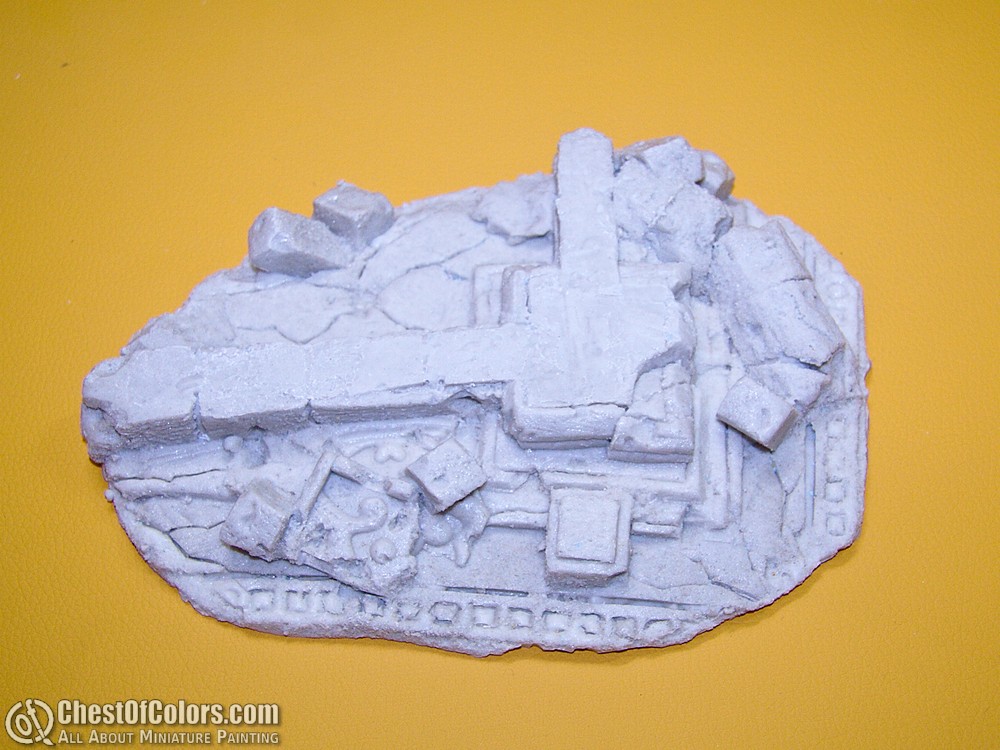
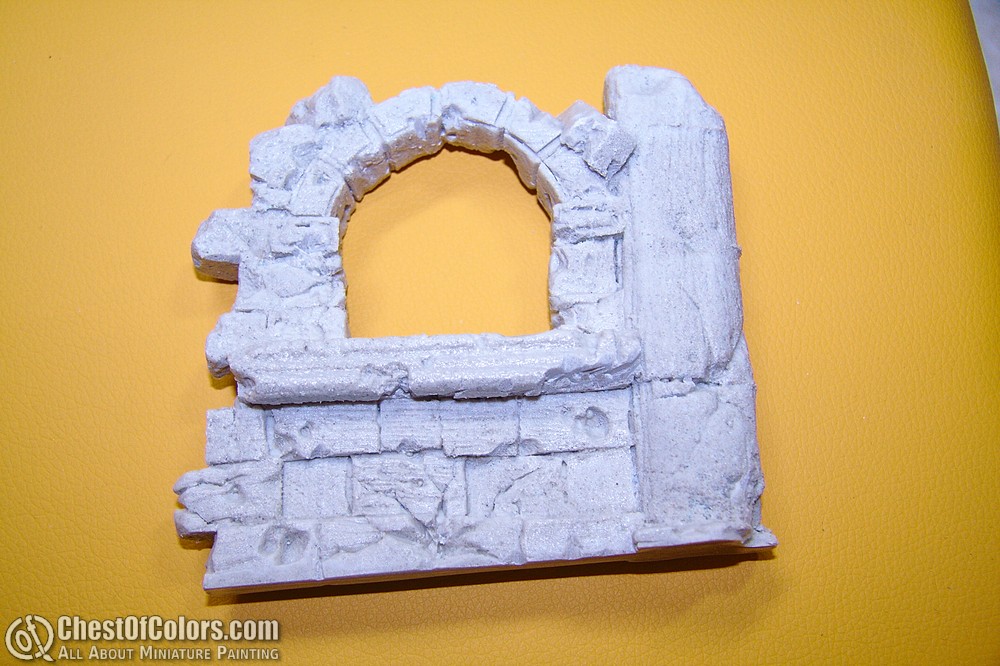
As you can see the design of those bases realy varies – from quite flat terrain like stone slabs, through more bulging bocage terrain. And top of the tops are broken column and ruined abbey bases – these are really great pieces that stand up to 5 cm above ground level. It is basically ready diorama. You just need to paint it. Stark texture of those bases should be a good help in wash and drybrush technique.
Below are photos of all the 3D bases I acquired:
Stone Slabs base

Straight and Curve Road bases


Straight and Intersection Bocage bases


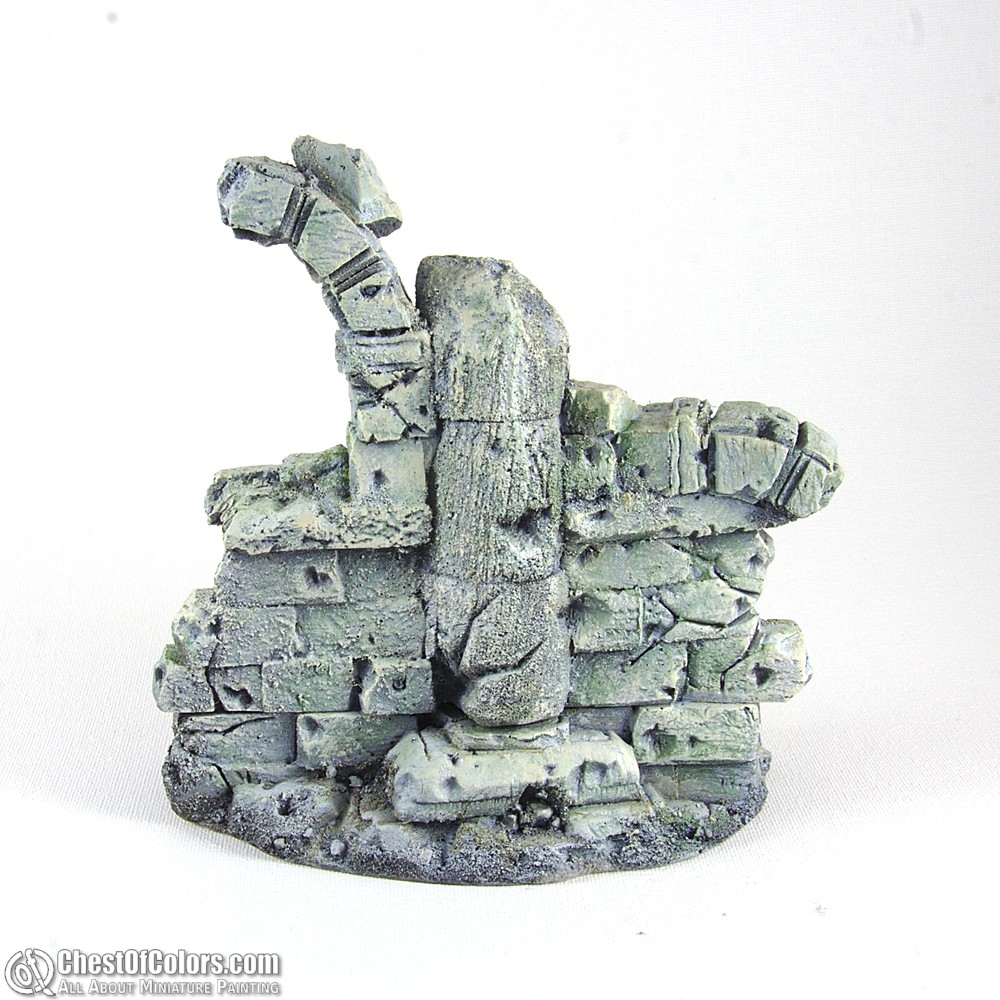
Broken Column

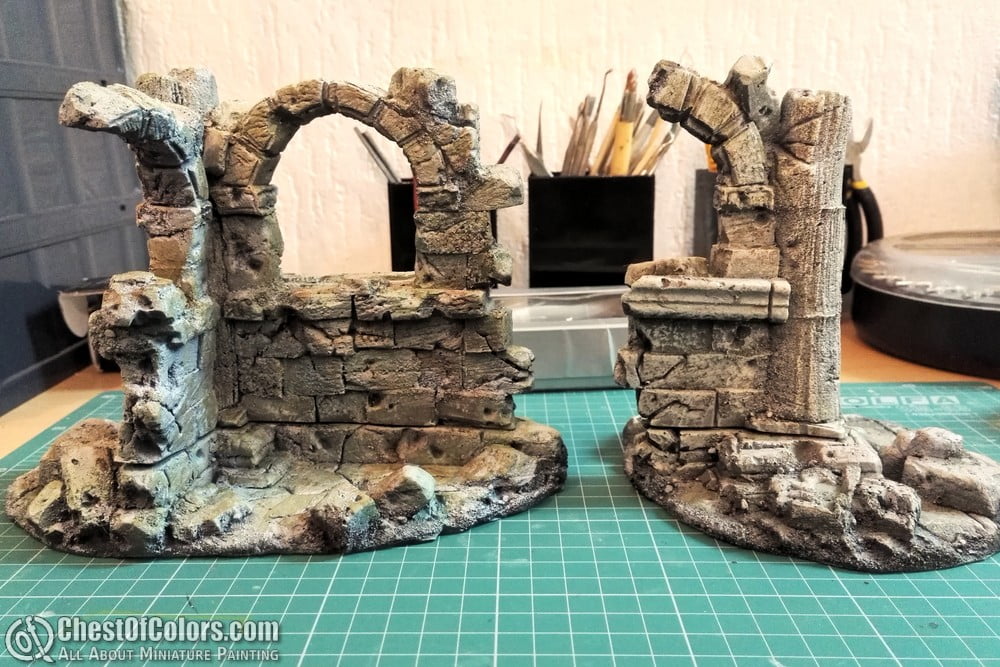
Abbey bases


Here are bases with 30mm figures for scale. Now you can see the real size of the terrain. There is a lot of place for many figures even on single base.

I also received some resin freebies from KS campaign: wooden bridge, 4 skeleton remains, altair and a throne. They will make nice addition to my dioramas.

Retail price of those bases varies from 8.50 EUR for flat bases to 21.50 EUR for the most elaborate ones. Is it much? Considering the fact that I would not make such imaginative bases myself (and certainly not from such durable material) it is a fair price. I received product ready to paint and use in wargames or just for miniature display. That saved me a lot of precious time. If only the quality of some casts was better 🙂 Then it would be perfect product!

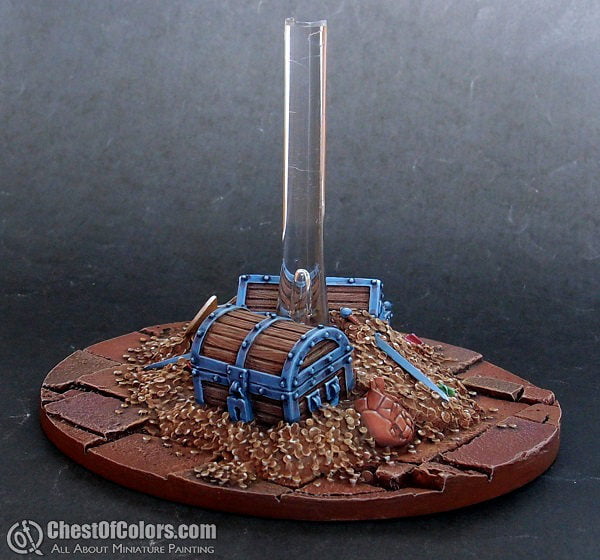
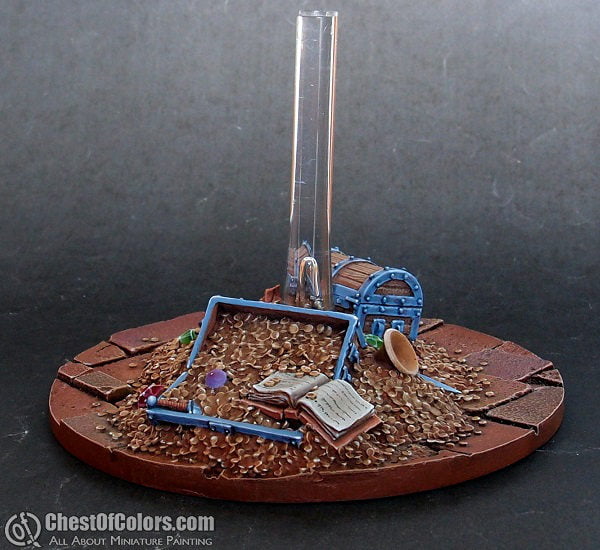
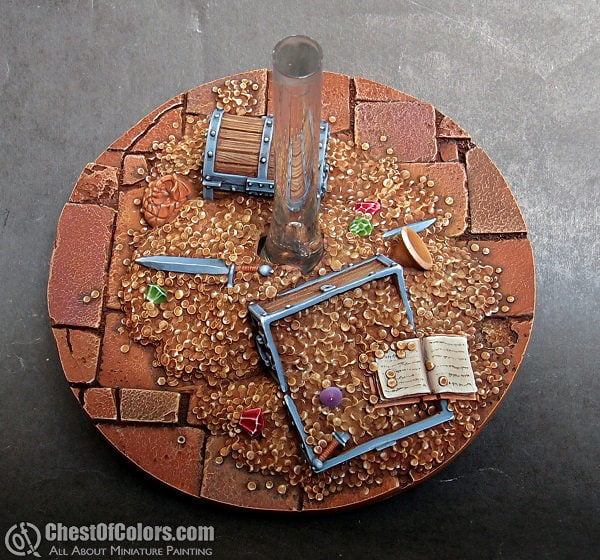
Treasure base
Nothing big but I just finished quite large base full of treasures. A goal for many adventurers that dare to enter mysterious dungeon. As with all the bases, there is always some compromise between details and time spent on painting. I tried not to paint every single gold coin separately and yet to make it look detailed enough. I hope that I achieved that.
What creature will guard all those treasures? You will see 🙂

StudioLevel terrain review

Some time ago we’ve been contacted by StudioLevel and asked if we could do a review of their products. We hadn’t seen them until the moment we received our samples, so it was a completely new product for us. We knew it from the advertising materials but getting a first-hand opinion was more important as their models looked pretty interesting on the website. Now they even have some promotional video clips, which you can see just below this paragraph, but at the moment of our testing these were not available yet. Long story short, we received one model set and two plants sets from them for testing and reviewing.
The products are quite obviously aimed at wargamers, and many of them will find these items pretty interesting. They can be used to make their tabletop battlefields look much more interesting with just minor effort.

StudioLevel Terrain wanted to know if their products can be of interest to miniature painters and modelers. If you’re looking for a brief answer, without all the details provided below, the answer is: yes, but only to some degree.
What we received
The samples that we received from SLT were: 1 set of “Archaic Ruined Walls”, 1 set of “Plants: Detail Mix” and 1 set of “Plants: Detail #2”. The products were packaged in plastic bags with paper labels. There was enough information on the labels, like addresses, explanations and some basic instructions. Not that these were really necessary.
The walls set was the most interesting to me, while the two plants sets left me pretty indifferent. So as these seem to be of really minor interest to me as a painter or diorama maker, I will address the last two only shortly.


Plants mixes
I couldn’t find these in StudioLevel’s catalogue, so I was unable to check how much do these cost. Eventually we were informed these are simply free bonus packs, which are not meant to be sold separately. While they are a cool freebie, I doubt they would make good standalone products. Why?
I assume most of you have have found your own ways to deal with the subject of vegetation/plants on your models. These can range from using smaller specimens of real plants, through plants made for train dioramas or toys, to aquarium plants. And aquarium plants are exactly what you find in these sets.


I don’t know about you, but I have easy access to fishkeeping stores, in which I can easily buy larger plants which can be divided into smaller ones or larger packs of smaller plants. While maybe not dirt cheap, these don’t really cost so much that it would be too expensive to pay like €8 or equivalent to have a nice supply of plants. I myself had bought two larger plants to split them into smaller chunks and have more than enough than I need to cover my tabletop for gaming.
Why should I buy these plants packs from StudioLevel Terrain is a bit unclear to me. Maybe if I didn’t know the alternative or source of these plants, was really low on storage space, or really low on money? But I cannot ever see myself purchasing any of these sets, especially that they have some more interesting and better detailed plants in their catalogue.
Additionally the quality of these plants and the way they are made makes them insufficient for any more serious modeling tasks beyond tabletop gaming. While they may be a great way to make your battlefield green, I don’t think you would consider them good enough for your miniatures or dioramas, but your mileage may vary. Our packs were enthusiastically received by our very own Balrog, now a miniature gamer (and painter) who happily added them to his own terrain collection!

So are they something with no potential? No, they just need to be slightly adjusted depending on their purpose. If they are to remain promotional/bonus freebies, I would clearly mark them as such. And if they are to be sold, I think they don’t make a very good standalone product but can be a part of interesting mixed packs, like a small pack of one tree, one bush and a few of these plastic plants, larger pack with several of each and a large pack with enough plants to cover a small tabletop battlefield. Even if not of real interest to painters or modelers, such pack might be cool for gamers who could easily make their battlefields green and full of cover.
The more interesting thing is definitely the Ancient Ruined Walls set, which I am going to review now.
Ancient Ruined Walls


This set looks is priced at €68 and looks very cool on promo materials and I must admit it can really easily be turned into an interesting (and pretty large) terrain piece even with minimal skills and effort. But what if your skills are much higher and you really want to put some serious effort into turning it into a breathtaking diorama centerpiece terrain? Well, I am not sure if this is the best choice. Why? Let me explain.
As you can see there are quite a few elements in the pack. Just enough to build three walls and one pillar/column with a statue on top. Yes, they may look good from distance and can surely look good from close up. Unfortunately I think you will have to put some work into concealing some shortcuts taken by the sculptor.
See the photos below for some additional comments.
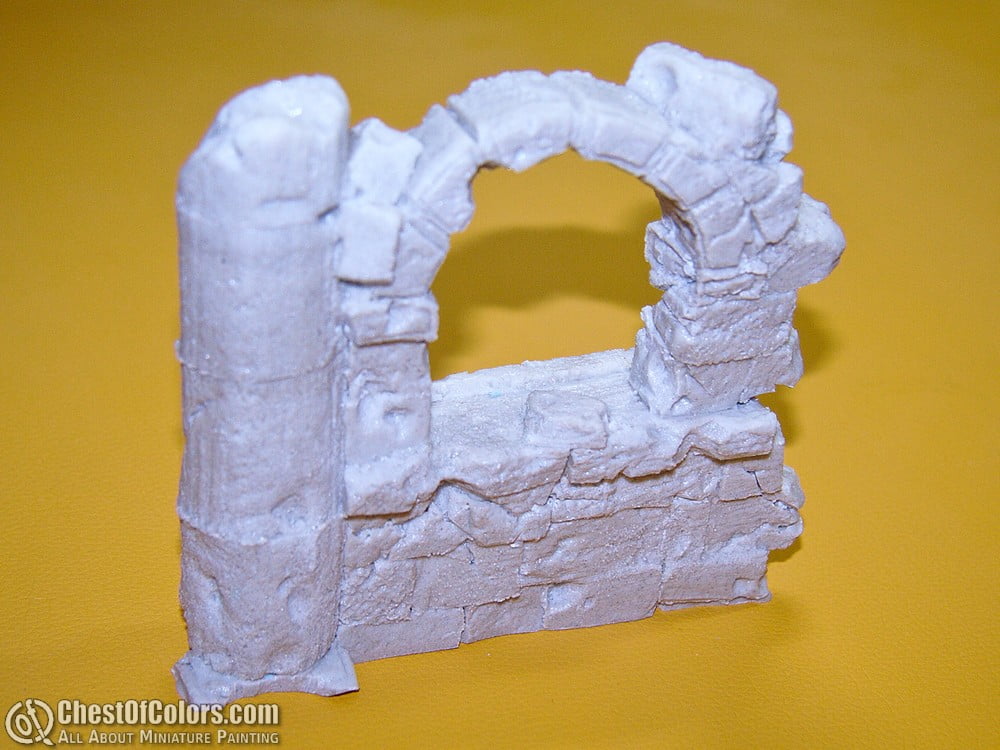


I am not any kind of expert in casting and resin, but the kind of resin used here was not the one I was used to working with. It felt rough, like there was a lot of filler in it. I can’t tell if this was the case or was it caused by any different factors, but the result was that working with it was less comfortable than I expected. It was not particularly difficult or annoying, but simply less fun than I expected it to be. It was partially balanced by the nice design and some details of the sculpts, but this first problem bothered me until I was about halfway done with the models.
The details, while quite plentiful, were not always clear and sharp enough (check the closeups to see what I mean). Or maybe I should say: they were soft where I would expect sharp, and sharp where I would expect smooth.

For example check the stone blocks on the photos – most of them have very sharp edges, as if they were precisely cut (with a laser, or maybe a modeling knife through XPS) but basing my expectations on the title of “Ancient Ruined Walls” I thought these should look different. Just check the ancient pyramids and temples – their stones have been already worn by sand, wind, rain, etc. They’re no longer sharp, but more softer-edged. And on the other hand, some damage, cracks and breaks in the stones look much softer than they should in my opinion. They don’t look like broken stone slabs but more like butter, putty or styrofoam pressed by some kind of sculpting tool. Depending on how fresh the damage is, these lines could be sharper to some degree.

Now while details like these may be irrelevant for a wargamer, they may be significant for some model builders. When you put multiple hours into your model or diorama (and hundreds of hours are not uncommon) you want to avoid such inconsistencies. And while these are more of ‘internal logic’ shortcomings, there were two things I really disliked.
Maybe they were just my personal preferences, or maybe just traits of my particular copy of the model, but that’s something that bugged me for a serious part of the process. And both of these issues can be collectively addressed as “roughness” or “graininess” of the model. Maybe it’s the casting or maybe it’s the sculpt, but I found many parts of the model rough. Just as if it was covered with glue and then with pretty fine sand. I don’t think that this coarse finish served the model well. To me it just made painting less comfortable, but I am well aware that for many others it can be an advantage, which will make painting easier.
Let me explain – when you are painting the model with relatively wet brush, such rough details will break your smooth brushstrokes and maybe even damage your precious paintbrushes. On the other hand they may be a blessing for drybrushers. When painting with the drybrushing technique you usually use a harder brush, which will be more durable and also sharper details will be easier to pick by drybrushing. So if you intend to paint the models in this way, consider it well suited for drybrushing. When wetbrushing you may need to be more careful, or take it into account when preparing the model for painting.

This rough detailing also felt out of place on the statue. It seems to depict some human figure, possibly a knight of old. The features and details are not clear and look weathered and faded, which is great and adds a lot fo character to the model. But then some parts of the model feel sharp and rough again. Grainy, almost porous. Wait, are we really talking about something “ancient” and “ruined”? Have you seen old statues? They usually seem to be pretty soft-featured, smooth, and details are often gone already. Surfaces are weathered and almost polished by atmospheric conditions. And this model feels rough, pumice-like. No, it was no fun for me, but definitely much easier for drybrushing.

Fortunately I had somebody who would enjoy this kind of painting! Balrog was waiting anxiously for his participation in painting of these models, so as soon as I said “come on, son, let’s continue together” he couldn’t get any happier! 😀

These models were perfect to teach him shading and highlighting on really large models, with washes and drybrushing respectively. Then we even added some moss to make the ruins look even older and I am sure they will be used frequently in our battles, as he was absolutely impressed by these massive castle ruins and the mysterious statue. Also seeing how easily he could achieve relatively good effects on these models made him happy and confident in his skills. So if you want something good for painting with beginners, these sets may be a perfect choice.


I didn’t allow him to assemble the models, except for dry-fitting, because I don’t think allowing a kid of his age to play with toxic glues is a good idea. But even he managed to notice that the parts don’t fit perfectly together. They fit well enough, so there’s no real problems in assembling them at all, but making this review a honest one requires mentioning that all the connections required several consecutive applications of glue, as there were gaps large enough to need more glue than a clean joint would.


But there is an easy answer to this problem. You don’t even have to fill the gaps with putty. You can cover them with moss or grass! 🙂

My opinion
Now do I think these products are a good pick for a diorama builder or miniature painter? Well, it depends.
They wouldn’t be my first choice for sure, but I can easily find several groups of hobbyists who would be happy to choose them.
First of all they’re good for beginners and slightly more intermediate hobbyists. These will be satisfied with the level of detailing and quality of execution, and should be able to cope with assembling and painting with ease.
See how good these models can look with just some simple work from a boy like Balrog and his dad:


On the other hand use of these models by more experienced and demanding hobbyists would require some more involved work from them which might make these models less interesting for them. For example while a beginner might be fine with some gaps in his model, an advanced diorama maker wouldn’t allow it to stay this way, especially in places where it makes little sense. More experienced painters may also be less likely to drybrush their models than beginners, which would call for a smoother finish of surfaces than what I got with my model.
Possible uses
And what uses could there be for such models? Definitely the most obvious one is for wargaming. Wargamers will find these models more than satisfactory, easy to build and paint, and they would be a wonderful addition to any fantasy battlefield! Such models could also be incorporated as parts of dioramas (or large scenic bases), even of showcase quality if you are willing to do some work to overcome their shortcomings. Or maybe even become a more interesting version of photo background for one’s models?
We’ll try to show you how the ruin can be used for gaming or as a part of a photo setup, but that will be covered in a separate post.

A lot of wood
Here is the first batch of painted stuff from minimonsters.eu. These are small and big barrels accompanied by outhouse. A lot of wood with steel elements. As for the wood color I airbrushed elements with flesh tone and when it dried I applied dark brown wash followed by drybrush of light flesh color. Then I emphasized highlights with precise brush. When necessary I applied wood grain texture with thin dark lines, like on small barrels that had no sculpted wood texture.


Here is picture of painted items with 28mm miniature (RedBox Games as usually) to give you idea of scale.


Something from minimonsters.eu
Recently I purchased few resin diorama items from Polish manufacturer minimonsters.eu. I would like to share with you my impression about them. Here is what I bought:
– Cottage
– Outhouse
– Wooden barrels
– Big wooden barrels
– Vases

(click to see bigger photo)
The items are made in 28 mm scale. Each set is packed in a small bag with label. The casts made of light grey resin are really good and I didn’t notice any bigger air bubbles or substancial mould lines. Let’s look closer at each set.
Cottage
The set contains 13 pieces that allow to assemble one building with following dimensions: 105 mm (height), 14 mm (lenght), 100 mm (width). The pieces are not bent and there should be no problems with the assembly. The doors are cast as one piece with the walls, so if anyone wants to make them openable, it should require some work. There are no details on the inside parts of the house (there in no floor either), so if you want an interior, you should do it yourself. This a different approach than for example in Tabletop World buildings (which have interior), although they are about 30% more expensive than those from minimonsters.eu. You should decide yourself whether you will use house interiors durring wargaming sessions or no.

(click to see bigger photo)
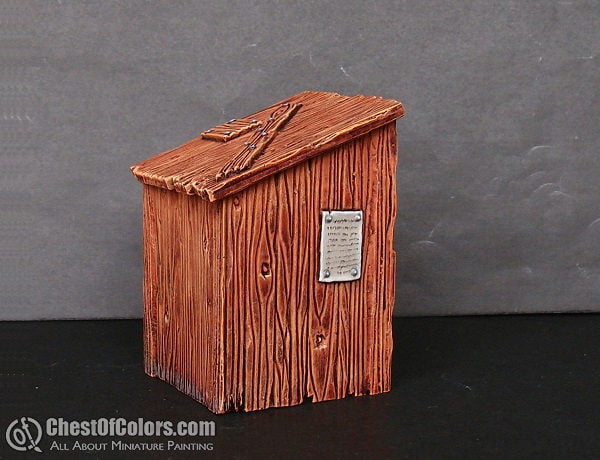
Outhouse
This little building has dimensions: 50 mm (height), 35 mm (lenght), 35 mm (width). The set contains 5 parts (4 walls and roof). Again – the parts are straight and fit together well. There is no interior either, but I will not complain this time. I’m not going to put any figure inside, although technically speaking there is room for one 28-32mm miniature 🙂

(click to see bigger photo)
Wooden barrels
Set contains 6 resin barrels 19 mm high, cast as one piece each.

(click to see bigger photo)
Big wooden barrels
Set contains 5 resin barrels 23 mm high, cast as two pieces each (barrel and cover).

(click to see bigger photo)
Vases
Set contains 6 unique resin vases 18-24 mm high, cast as one piece each.

(click to see bigger photo)
Overall I think that the items from minimonsters.eu are worth their price and should make nice diorama or battlefield addition. Soon I will paint them and show you finished pieces, so stay tuned.