

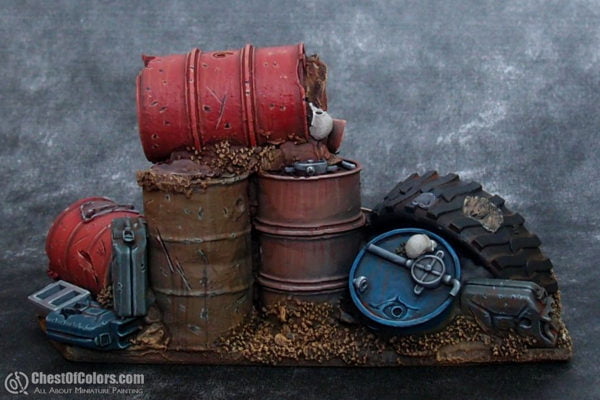
Second terrain pierce from NEW Bantam Alley I Wargames Resin Bits & Terrain Kickstarter is finished. This time it’s a barricade consisting of brick walls, barrel and some other post-apocalyptic stuff. Just like the previously painted fuel depot, it is also very detailed and painting it was a real pleasure. Such barricade can really be a nice decoration of any gaming table.


Abandoned fuel depot
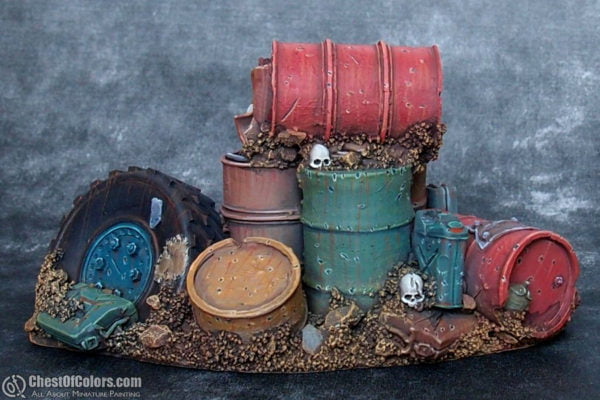
Here is my first painted piece from NEW Bantam Alley I Wargames Resin Bits & Terrain Kickstarter. I did not expect that painting a couple of rusted barrels can be so pleasant 🙂
On the last picture I placed 32mm miniature for scale. A human sized figure can really hide behind these barrels.


Bantam Alley Wargames Resin Bits & Terrain – review
I was given an opportunity to write a few words about products from NEW Bantam Alley I Wargames Resin Bits & Terrain Kickstarter. It is launched by StudioLevel – a Polish company which already have quite a lot of cool diorama elements (mostly fantasy ruins).
The products offered on Kickstarter are 28-32mm finest quality handmade resin casts in post-apocalyptic and industrial theme. They include such cool stuff like detailed technical plates, hatches, barrels, furniture or even whole ready for painting scenery!

(click to see bigger photo)
On the basis of items I received I can say that StudioLevel have done a wonderful job. Items are made of dark, high quality resin and I found no air bubbles or casting imperfections. I am really impressed with their casting quality. They need only a minimal amount of work before painting. This stuff should be great addition to any diorama or scenic base. Let’s have a closer look at individual items:
Wrecked Hummer – there is really tons of details to be painted:


Barricade – another detailed diorama element:


Barrels – even trashed barrels can look cool:


Large engine:

Large electric boxes:

Bottle crates (and small electric boxes):

Round hatches (40mm to 20mm diameter):

Small square panels (average 20x30mm in size):

Large panels measuring from 110x110mm to 60x60mm:


Items that I received for this review are only a small selection of all the available pieces that are offered on Kickstarter. If you want to acquire some really great items for wargaming or to diversify your diorama or figure bases, you can give your support for Bantam Alley KS. If you are more of a gamer than painter, you can even buy painted versions of these products.
I am going to use this stuff on diorama for Fallout: Wasteland Warfare which I hope to receive in a couple of months. Of course I am not going to wait that long with painting of these wonderfull items, so expect painted samples here in the following days.

Broken Column
This is my third painted 3D Base Modular Terrain, but this time not a flat one! The walls elevate up to 60 mm above ground (or rather table) level. The Broken Column base is one of my favourite, maybe because it’s so epic.
I painted the base in similar way as Transition C/R base in this post. The ground was airbrushed with shades of light brown, while stones in light grey (with some color variations). Wash and drybrush helped to blend all of this.
Here is how the base looks finished. I used 30mm miniatures for scale (this time from Mierce Miniatures).


(click to see bigger photo)

Painting first 3D Bases – a step-by-step description
I painted first of recently reviewed 3D Bases Modular Terrain. So far I managed to paint two bases – Stone Slabs and Transition C/R.

(click to see bigger photo)
These are fairy simple bases (flat ones), so this is why I started with them 🙂 Here are the steps that led me to final effect.
Stone Slabs
After cutting off some excess material on the edges of the base (I wanted the edges to be as straight as possible, so there will be no spaces between individual bases) I washed the base in hot water brushing it with soap. I wanted to remove the agents from casting process that could make the paint stick worse than it should. Then I airbrushed the base with Vallejo poliurethane primer – in this case German Panzer Grey as I have large 200 ml bottle of it. I hope the primer will be as tough as German Panzer tank 🙂 Here is how it looks now:

As you can see not much has changed. Next day (when the primer dried) I airbrushed the whole base in beige color. Then spraying with lower pressure (and more diluted paint) I colored random slabs in different colors (browns, greys, reds, etc) by adding various colors to the mix. I tried to be as precise as possible (as my rather poor airbrush skills allowed me to). Now the base is much more colorful:

Then I drybrushed the base (using the biggest brush I had, which was round flat 5) with base (beige) color with addition of some white and yellow:

The base looks better now but is missing some shadows. To correct this I appled Vallejo wash Black Shade (the one in huge 200 ml pot) mixed with a drop of Vallejo clear red to make it more brown than black. I thinned it with distilled water as I did not want the wash to be too sharp. The common drybrush and wash made the various color slabs to harmonize with each other. After that I sprayed the whole base with Maimeri Matte Varnish in spray can – the same I use on my miniatures. The goal was to protect the paintjob and to eliminate any shine from the base. Now the base is finished:

Transition C/R
The steps on this base are quite similar to those on Stone Slabs one. After washing the base I applied random spots of white glue and sprinkled static grass on it. I chose spots with bare ground, not where the stone slabs were. When the glue dried I removed excess of static grass with a brush and primed the base just like Stone Slabs one. The next day I airbrushed the whole base with shades of brown, and then focusing on details I sprayed stone slabs with shades of grey (and purple, blue, brown,…) and grass with green:

Then I started drybrushing with lighter shades of coresponding colors – ground with light yellow, slabs with light grey and grass with light green:

Now it’s time to build shadows. Again – by applying dark brown wash. I used wash only on slabs, as I did not want the ground to be darker than it already was. After it dried I sprayed the base with matte varnish. The base is ready:

This is the way I painted my 3D Bases. Perhaps it is not the best or the only way to paint them, but I wanted to have them them finished decently in relatively short time. Painting each base (all the steps) took me about 1 hour, not counting cleaning the airbrush 🙂
Let’s see how the bases look with miniatures. I can create many epic scenes, like:
– demonic encounter in dungeon

A group of adventures wanted to lay their hands on tempting demonettes when out of a sudden a large and sinister demon appeared spoiling everything.
– maybe some undead this time?

A couple of brave warriors exploring the dungeon were surrounded by horde of undead (much less tempting than those demonettes!)
– Viking raid!

Vikings rarely assault toilets, but I don’t have any more serious buildings finished yet, so it must be enough for now.
– Confrontation!

For those of you who prefer oldie but goodie Rackham Confrontation – no problem. Wolfen pack led by famous Killyox faces vicious drune horde.
Those bases look much more realistic than flat playmats. And the two bases I painted are the simplest ones. I cannot imagine how cool more elaborate bases like Broken Column or Abbey would look painted! I will find it out as soon as I find time to paint them 🙂