Captain Lysander of Imperial Fists Space Marines is still a popular miniature, so although I painted the miniature several years ago already, I still think the tutorial may be interesting to some of you. Especially if you want to see how to paint terminator armour or power armour for your miniatures.
Preparation of the model
I started by cleaning the model. This time the cast was of pretty good quality so there weren’t many mold-lines to clean. I drilled holes for pins, and glued the pins to the joints. I primed the mini white, as painting yellow over black primer would take too many layers of paint and too much time. I left the arms unattached, because otherwise reaching some parts of th mini would be too difficult.
I also created the base. I attached two plastic elements on it, filled one of them with PVA glue (to create the slime inside of the hole) and primed it black.
Painting begins…
I painted the blue parts with Vallejo Game Color Ultramarine Blue, and applied some initial shading with the color which I created by mixing Ultramarine Blue with Black and thinning the paint a lot. I also basecoated the red parts with Vallejo Game Color Red Gore, and the black ones – with Black. I washed the red parts with a thinned mix of Vallejo Smoke and Black. I cleaned the reds with another coat of Gory Red, but left the shading visible.
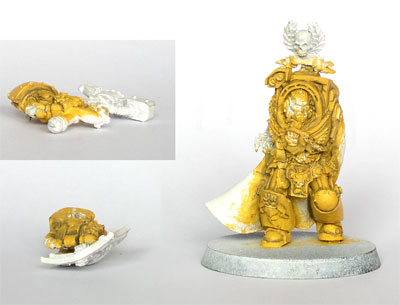

The base was painted about the same way, just more layers of washes and glazes wera added. I also painted the slime inside of the hole with Vallejo Game Color Scorpy Green, and added several coats of glossy varnish to make the slime look more liquid.
Painting terminator armour
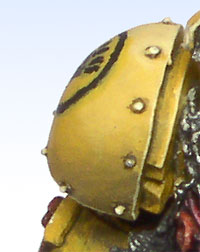
Then I started painting the armour. I had to create smoother blending between the shading and the basecolor. I mixed the colors I used – the base color, and the shading color, as well as two midtones (2 parts of the shading mix plus 1 part of the base color, and 1 part of the shading mix plus 2 parts of the base color). Then I started blending – I used the method I often use: I applied the dark and the light color where they should be, then placed the midtones between them, and then wetblended the transitions.
I did the same with highlighting: I decided to use Vallejo Model Color Ivory for highlighting. Again I put the base color, pure Ivory, and two midtones (2 parts of Ivory plus 1 part of the base color, and 1 part of Ivory plus 2 parts of the base color) on the palette. I applied Ivory on the most highlighted places (edges, etc.), placed the base color, and then the midtones. I wetblended the transitions. This way I had the basecolor cleaned, and the blending pretty smooth.
I started with the part of the armour which would be covered by the shield, because later reaching it might be too difficult – especially the left hand and arm. Then I painted the rest of the armour, and started painting the shield.
The shield
I decided the shield shouldn’t look like the armour, oso I went for metallic paintjob. I applied the alcohol based Vallejo Super Silver, and again washed it with several colors – greens, blues, oranges, browns, smoke, and black. Then I retouched the whole thing by a slight drybrush od Vallejo Game Color Chainmail Silver, and then picked out the edges with Super Silver. The laurels were besecoated with a mix of Vallejo Game Color Dark Green and Vallejo Model Color Olive Grey.
For highlights I kept adding Vallejo Model Color Olive Green, and then some Ivory. The eagle was painted just like the rest of the red elements – Gory Red, a wash of Black+Smoke, re-applying the Gory Red, and highlights with the base color with more and more Vallejo Game Color Pale Flesh added.
The black lines were cleaned then with a fine brush and thinned black paint. The whole eagle was glazed twice with really thinned down Transparent Red to add a bit vibrancy to the color, which got a bit desaturated during highlighting. The fist (on the shield, on the hammer, and on Lysander’s chest) was painted just like all the black parts of the mini – Black basecoat, and highlighting with more and more Ivory adeed. The transitions were smoothed by wetblending.

Blue cape
Then the blue was painted. Again I used Ivory for highlighting, and black for shading. I used exactly the same method as before – several colors next to each other and wetblending. When I had all these colors painted, it was the time for painting the face.
Face
I started with Vallejo Game Color Dwarf Skin, but with a bit of Dark Green added to tone the color down a bit. Then I painted the eyes: first Black + Smoke, then White – leaving a thin line visible around, and finally the pupil was painted with. Then I corrected the skin around the eyes with the basic mix. The first highlight – which was applied over most areas – was thinned Dwarf Skin. Then I kept adding Vallejo Game Color Elf Skintone to successive layers.
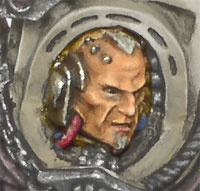
Then I added a bit Pale Flesh to one layer, and the last highlights were made with pure Pale Flesh. I made the lines between the head and the other elements (the armour, the implants, etc.) darker by fine application of Vallejo Model Color Smoke. The hair was painted with Cold Grey with a tiny bit of Smoke, then highlighted several timed by adding Ivory.
Skull
All the skulls and parchments were painted the same way: The base color was a mix of Vallejo Model Color Cavalry
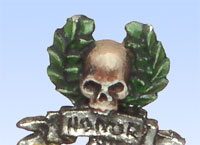
Brown and Vallejo Game Color Cobra Leather, and then highlighted several time by adding Vallejo Game Color Bonewhite, and later – Ivory, up to pure Ivory. The outlines and eyesockets here painted with Black (mixed with a small amount of Smoke).
Time to assemble the model…
Then mini was assembled. The metallics were taken care of again, and all the rivets were outlined with the Black/Smoke mix, and painted again with Chainmail Silver. The whole mini was given a thin coat of glossy varnish for protection, and I added the few freehand details – the Imperial Fists chapter symbol, the writings on the ribbons, and the purity seals.

Freehand – Chapter symbol
I started painting the chapter symbol by painting a circle. It didn’t look all this even , so I had to correct it in several places with the Sunblast Yellow/Yellow Ochre mix and Black. Then I painted the black fist. The next step was adding the yellow lines to divide the parts of the fist. I finished it by cleaning the freehand with black. I decided to leave the corrections of black to the end, because it covers well, and so the corrections would be pretty easy.

As for the other freehands, they were just painted with some patience and a fine brush. No tricks there…
It’s a kind of… OSL
The mini was then sprayed with several light coats of glossy varnish, and then one heavier layer was applied again. I drilled a hole in the base and attached the mini to it. When the glue dried, I applied several glazes of thinned Scorpy Green to the metallic parts close to the green slime, followed with several thin washes of Transparent Green to run into the recesses. The edges were then picked out by Scorpy Green with a small addition of Ivory again.
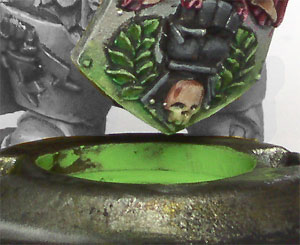
I sprayed the mini with flat varnish to remove the sheen. Later I polished the metallic parts a bit, because the flat varnish dulled the metallics too.
Final result
You can see the finished mini here:
I hope you found this tutorial useful. And if you have any comments or questions – feel free to leave them below. Thanks a lot!


I am a 28mm/54mm Miniature painter, and gamer and I think the paintjob is amazing
I find it very odd that you went through all the trouble to do a painting tutorial on a mostly yellow armored model (something difficult for most painters) and yet didn’t mention once what colors were used in creating the yellow. Is it a family secret?
I think that yellow color is very beautiful. Very muted, not garish like most other Imperial Fist-minis, quite elegant. What were the base and shading colors?