Lava tutorial – Base for Taxxis

A long long time ago…. 😉
… various lighting effects were quite trendy (and now they’re pretty oldschool, so maybe nobody cares for a lava tutorial?). Current trends in miniature painting moved away from them – which is partially caused by currently trendy color schemes. Natural colors and realistic compositions are popular now.

Why write a lava tutorial?

My ignorance made me chose this lava effect anyway, or maybe it was my contrariness? Because I still approached this subject in a different way than in the days when the whole painting community was amazed by bright and vivid colors and sharp lighting. I minimized the effect of lighting and I hope it’s enough to avoid calling this paintjob OSL 😛 After all it would make this article an OSL tutorial instead of a lava tutorial – and it’s not the purpose 😉

I don’t know if in this situation anybody is interested in a lava tutorial, but I’ll encourage you by saying painting lava can be very easy!

Photo: How to paint lava - tutorial - Taxxis queen of undead

Preparations

This lava tutorial isn’t anything unusual, so just like with most tutorials, it’s best to start with the very preparations. On grey basecoat I applied white paint to the parts where lava and glowing cracks were to be seen. I needed a few layers as the paint had to be smooth.

Photo: How to paint lava - tutorial - Taxxis queen of undead

Photo: How to paint lava - tutorial - Taxxis queen of undead

Photo: How to paint lava - tutorial - Taxxis queen of undead

Photo: How to paint lava - tutorial - Taxxis queen of undead

First colors and choice of paints

When it was dry I left white in the hottest parts, and brushed Vallejo Model Color Transparent Orange. It cannot be called drybrushing, because if you have worked with Vallejo transparent paints you know how hard it is to do. Take an old big brush, and when you load it with paint, remove the excess so that the paint doesn’t run into recesses. Transparent paints are very saturated and so without big effort I achieved first effect of glowing with just two layers.

Photo: How to paint lava - tutorial - Taxxis queen of undead

Photo: How to paint lava - tutorial - Taxxis queen of undead

Photo: How to paint lava - tutorial - Taxxis queen of undead

The heat is on!

Where the heat is less intense (which means toward the top) I applied stronger orange color. I don’t know if this stage can be omitted, so if you feel like experimenting this might be the right and not very risky moment for trying. 😉 For this stage I used Transparent Orange mixed with Transparent Red (both from Vallejo Model Color range) and applied this mix onto a smaller surface than previously with the same technique similar to drybrushing.

Photo: How to paint lava - tutorial - Taxxis queen of undead

Photo: How to paint lava - tutorial - Taxxis queen of undead

Photo: How to paint lava - tutorial - Taxxis queen of undead

Photo: How to paint lava - tutorial - Taxxis queen of undead

Photo: How to paint lava - tutorial - Taxxis queen of undead

Photo: How to paint lava - tutorial - Taxxis queen of undead

Photo: How to paint lava - tutorial - Taxxis queen of undead

Photo: How to paint lava - tutorial - Taxxis queen of undead

Cooling down…

I was happy to use the Black Ink from the P3 range, which I thinned even more, I brushed it onto the horizontal surface of the rocks and I also caught a part of the highest rock.

Photo: How to paint lava - tutorial - Taxxis queen of undead

Photo: How to paint lava - tutorial - Taxxis queen of undead

Then I took black paint and – like on the picture – drybrushed the sides in the very normal way. Once and twice, and… I don’t remember how many times, but I believe you will see when it should stop. You see – we even found use for drybrushing in our lava tutorial!

Photo: How to paint lava - tutorial - Taxxis queen of undead

Photo: How to paint lava - tutorial - Taxxis queen of undead

Photo: How to paint lava - tutorial - Taxxis queen of undead

Photo: How to paint lava - tutorial - Taxxis queen of undead

Photo: How to paint lava - tutorial - Taxxis queen of undead

Not so harsh!

To soften the contrast between blacks and hot parts I mixed Transparent Orange with Woodgrain. It’s important to keep this layer transparent, because no opaque layer would join the parts we’ve already painted.

Photo: How to paint lava - tutorial - Taxxis queen of undead

Photo: How to paint lava - tutorial - Taxxis queen of undead

If you don’t have transparent paints, then I would suggest to start the whole painting from pale and cold yellows, and then add darker and warmer shades. And when we reach this point I recommend going from yellows to dark warm reds, and only now brushing it with black paint.

Detailing

Now it’s time to improve details, as real lava is speckled, and if you feel like playing a bit more, just take white, orange, or orange with woodgrain, and splatter some of it onto the surfaces. You just need to aim well! 😉

Photo: How to paint lava - tutorial - Taxxis queen of undead

Photo: How to paint lava - tutorial - Taxxis queen of undead

Photo: How to paint lava - tutorial - Taxxis queen of undead

Finishing touches

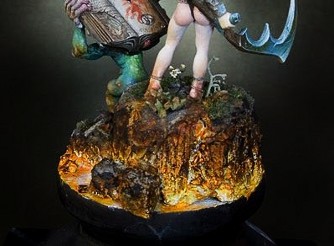
No lava tutorial would be complete without the finishing touches… So now I brushed the upper parts of the most protruding rocks with light grey, and added some vegetation which wasn’t burnt by the heat. In normal conditions I wouldn’t expect anything to survive… but I am no expert in lavas as I live in a pretty safe region, but for this model it seemed acceptable.

Photo: How to paint lava - tutorial - Taxxis queen of undead

Photo: How to paint lava - tutorial - Taxxis queen of undead

The finished model can be seen in my gallery.

Tell me, please, if you found this lava tutorial helpful. There is a follow-up to it on my Painting Mum blog, which presents a slightly different approach to the subject. Can you tell me which one suits your needs better and why? Thanks!

UPDATE: If you would like to know how to make more dynamic, splashing lava, follow the link to my other tutorial: How to make lava splashes. Enjoy 🙂

— Ańa

How I painted wings for a Demon Prince of Nurgle

It must have been in 2008 that I painted two commissioned Chaos Demon Princes of Nurgle in that pre-heresy color scheme (white armor with green decorations). At the time everybody used winged Demon Princes for Warhammer 40.000, so these had to have wings, too. So I used wings from Heresy Miniatures B’hakoth model, converted them and painted in a disgusting Nugle way. But this only started the series of questions how I painted these rotting leathery wings. To avoid responding to every question separately, I created this tutorial showing how to paint wings for a Nurgle Demon Prince.

Photo: How to paint Demon Prince of Nurgle wings - Tutorial

Here’s the first wing. It’s more or less finished, and at this point I decided to take pictures of the process of painting the other wing.

Photo: How to paint Demon Prince of Nurgle wings - Tutorial

Generally I don’t try to analyze or organize thoughts clouding in my head in any logical way… (otherwise I might decide that if I don’t know where to start, I should not start at all ;-))

I prefer to go all ahead instinctively… to keep my thoughts busy (especially to keep my left hemisphere busy, so that it doesn’t disturb the right one :-P) and to start painting… and to hope the rest will be fine somehow.

What I did first was outlining the shape of the “skin” which remained on the wing.

I think it wasn’t a bad choice because in case anything had been wrong, I still could correct it easily, because this light blue color would be easier to cover than red.

Photo: How to paint Demon Prince of Nurgle wings - Tutorial

The blue color is probably a mix of P3 Coal Black + P3 Menoth White Highlight / Vallejo MC Ivory 918 (you can use any of the two alternatives).

The remaining surface was painted with Vallejo MC Woodgrain (transparent) 70828.

Photo: How to paint Demon Prince of Nurgle wings - Tutorial

The next photo shows the wing during application of highlights to the skin:

Photo: How to paint Demon Prince of Nurgle wings - Tutorial

Hmm, I didn’t finish it and I started shading the border between “skin” and “under-skin”.

You can see how unsystematic I was (that proves that the wing was created by Chaos ;-)).

I also added a stich on the “skin”.

Photo: How to paint Demon Prince of Nurgle wings - Tutorial

I returned to highlighting the “skin” and modified my concept for colors.

Even the previous photos shows that I added darker decolorations of a green shade (it’s a glaze of P3 Coal Black + Vallejo Smoke Game Ink). The same color as the skin on the final color of the demon’s arms.

I also added some light blue by highlighting P3 Coal Black with white (P3 Morrow White).

Photo: How to paint Demon Prince of Nurgle wings - Tutorial

That’s more or less what my painting of the demon prince’s wings was like.

Total chaos can sometimes make painting even more enjoyable, and sometimes can only make it more difficult.

This time it was ideologically necessary. 😉

And that’s what the wings looked like in the end (I only painted some chipped paint on the green arrows later.):

Photo: How to paint Demon Prince of Nurgle wings - Tutorial

If you still have any questions or suggestions – feel free to share them in a comment. I’ll try to check them and leave answers.

Enjoy your painting and share your results!

— Ańa

How to paint marble bases

I’ve been asked questions how to paint marble, like on the base of my Space Marines Librarian. As people seem to be interested in explanation of my way of painting marble, here it goes:

How to paint marble

I used VMC 907 “pale greyblue” as my base color.

Photo: How to paint marble bases - Tutorial

I stained the surface with dark stains of wash made from VMC 939 “Smoke”. Beginning of this stage can be seen above, and the final effect – below:

Photo: How to paint marble bases - Tutorial


While increasing the intensity of the wash I outline the streaks achieved previously by several layers of wash and make them bolder. I also create a few more streaks:

Photo: How to paint marble bases - Tutorial

Effects of this operation can be seen below, just like thickness of the base color (ie. thinned a lot) which was still used to highlight the palest parts and to emphasize the edges where colors change:

Photo: How to paint marble bases - Tutorial

I painted some veins with the base color

I used wash of VMC 938 “transparent blue” in some places, where my intuition suggested, I created spots. And then I used the same color, but thinned it less, to draw places for next veins.

With a wash of VMC 828 “Wood grain” I stained the surface just as I did before with blue.

Photo: How to paint marble bases - Tutorial

With a thin brush I painted veins – cracks, using a mix of “Smoke” and “Transparent Blue”. It was nearly black, but I didn’t use black as I didn’t want the veins to contrast too much with the rest of the surface.

I emphasized the veins with the base color and the same brush, and I added a few more veins. I also added a few spots in this color.

I was only missing a few darker accents – deeper in the sculpt. But this was done with ground old dry pastels in color of dark browns and the scenic water effect, which I am presenting below. But you will find your own ways of finishing your marble.

Done!

Photo: How to paint marble bases - Tutorial

So that’s the way I painted my slab of marble. Everybody might prefer their own ways, but maybe my method will be useful for you? 🙂

There are many kinds of marble, though. If you are interested, let me know and maybe one day I will be painting another marble base so I can take photos and show you how to deal with different marbles. Or maybe you want to share your ideas?

How to paint OSL effect on a jump pack

This is a little tutorial on how to paint OSL to give a little color to your assault packs, giving them a brighter and yet a very real effect making them unique in a table without spending lots of time, since the end result can be achieved in more or less than 15 minutes to a full 5 man crew.

Why go with OSL?

I’m painting an assault squad form my Imperial Fist Army and decided to give it an extra touch to the jump packs, usually we give them the burnt effect some battle damage and we are happy, but what about give them something more?

So I remember just how fantastic is the effect of a welding torch when in use, something like this:

Photo: How to paint OSL on jump pack - Tutorial

Painting OSL

Then I decided my jump packs should look like this but in standby mode, I didn’t want to sculpt the flame.

After I painted the jump packs and gave them a dirty look with black and Smoke (VGC) they looked a bit boring

Photo: How to paint OSL on jump pack - Tutorial

Next all the recesses were painted with Necron Abyss (GW foundation) leaving the rest of the reactor untouched. This was made painting always three levels: top ring, middle ring and bottom of the reactor (fig.2)

Photo: How to paint OSL on jump pack - Tutorial

The result is almost unnoticeable but in the end will give you the blue shine needed to stand out from the black.
Now begins the highlighting of the reactor by brushing just the lines that define the several rings of the reactor with a mix of Necron Abyss (GW foundation) + Magical blue (VGC) and the bottom of the reactor, leaving always the darkest parts untouched.

Photo: How to paint OSL on jump pack - Tutorial

Now we start to see results.
The highlights continue with Magical blue (VGC) but now we start to decrease the area painted leaving some of the previous color showing.

Photo: How to paint OSL on jump pack - Tutorial

At this time there is no need to be overcautious when painting since this will make the effect more real.

In the next step were used magical blue (VGC) + Space wolves grey (GW) again your stroke is getting smaller.

Photo: How to paint OSL on jump pack - Tutorial

Now we start painting with a little more detail, using Space wolves grey(GW) the brush strokes were done in a kind of checkered pattern, the top level of the reactor paint was applied in the edges, the middle level the color was painted in a cross pattern and a dot was made in the middle of the lower level.

Photo: How to paint OSL on jump pack - Tutorial

Now it starts to look like a welding torch, finally the pop-up factor was used with plain white doing small dots in the edges of the top and middle level, in the bottom dots were painted randomly to give the final look.

Photo: How to paint OSL on jump pack - Tutorial

Possible improvements

I know that the gaps should have been filed, and with them filled the final result would be much better, but this was a speed painting and the crew was already assembled.

Now with a little more time and care the end result should be fantastic. As I finished the assault crew I started to think how cool it should look given some purples to the blues, if someone tries this let me know how it looked.

Hope this was useful, have fun.
— Pandadosmares

Your miniatures have stories to tell.
Let us help them speak.

Get in touch today and let’s give them the colors they deserve.

How to paint NMM chrome – SENMM Wolf Priest tutorial

Maybe the huge hype for SE-NMM and NMM chrome has already passed, but this tutorial is surely still worth publishing. In 2005 I painted a Space Wolves wolf priest and people asked how to paint NMM chrome like the one on that model.

As I was receiving questions about my Wolf Priest and the way I painted him, I spent some time and typed this description for you. Maybe it’s not a typical step-by-step, but it’s the best I could do with the mini already painted and even not having it at home anymore. Enjoy 🙂

Photo: NMM chrome - Tutorial

First steps

After spraying the whole mini black, I applied a layer of white over the kneepads and other elements which were supposed to be chrome.

Fur cloak

I painted the internal side of the fur with Vallejo GC41 “DWARF SKIN”. Then I highlighted its protruding parts and the lower parts where more light falls. I did it by adding more and more Vallejo MC918 “IVORY” to GC41.

I painted the fur to imitate the real wolf skin’s colors and patterns, using Vallejo MC992 “NEUTRAL GREY” near the outer parts (the edges), and Vallejo GC40 “COBRA LEATHER” nearer the center of the surface. When the paints were dry, I washed the cape with very thinned black paint.

Before the wash was dry, I applied another layer of white basecoat onto the parts which I wanted to be painted like chrome.

When the paint dried, I decided to add highlights: I used Vallejo MC907 “PALE GREYBLUE” for that, and with the side of the brush with tiny amount of paint on it I brushed along the whole fur’s surface.

Skulls

I started with basecoating with Vallejo GC40 “COBRA LEATHER” – except for the eyes and deep crevices. For highlighting I kept adding more and more Vallejo MC819 “IRAQUI SAND”. The last color applied was pure MC819.

NMM steel

I painted the steel (or silver) elements with the NMM method. For my basecoat I chose (like I always do) Vallejo MC903 “INTERMEDIATE BLUE”. The shading is done with black paint there, where you don’t need to go overboard with detailing and color transitions. There where I need smooth blending of colors I shade by adding more and more black to the black color. I clean and correct the parts which got messy, and highlight by adding more and more white to the base color. The final highlights are placed with pure white.

NMM gold

I used the same method to paint gold using Vallejo GC40 “COBRA LEATHER” as my basecolor, washing it with Vallejo MC939 “SMOKE”, and then – when the wash was dry – I highlighted with Vallejo MC877 “GOLDBROWN”. Where I wanted sharp highlights I placed dots of white paint.
I think I can omit the part about the grenade? 😉

NMM chrome

I started painting with drawing the horizon on all the chrome elements with Vallejo MC822 “GERMAN BLACK BROWN”. The color of the ‘ground’ reflected in chrome depends on the color of the potential terrain. I decided to mix this basecolor with Vallejo GC40 “COBRA LEATHER” and highlight it by adding Vallejo MC819 “IRAQUI SAND” to the mix. So I painted the reflection of the ground going from the darkest to the lightest color 🙂 and I paint the reflection of the sky in the same way. The upper part was painted with Vallejo GC22 “ULTRA MARINE” (with a slight addition of Vallejo MC807 “OXFORD BLUE” in the darkest part), and then I only highlighted adding more and more white. The sky just over the horizon must be white, just like the edges of the painted part.

The more the surface is leaning toward the ground, the more ground you see in the reflection. On the other hand – if the surface is rather pointing upwards, then you will see more sky than ground in the reflection. The same applies to painting the wolfheads. 🙂

There’s one more thing you need to remember while painting chrome – every ‘tube’ or long round element – regardless on its position – will always have the horizon’s reflection along the ‘axis’ of the element. You can see it on my Liralith (in Hassslefree Miniatures gallery).

Black armour

And now I had to clean up the black armour, which was stained and dirty after the whole painting. I covered it with black paint, and applied the first highlight. It covers the biggest part of the surface, and every next highlight is placed on smaller and smaller surfaces. But I think it’s obvious, isn’t it? 😀

I highlighted by adding white, but now I know that it looks good if for the first highlight you add a bit of Vallejo MC807 “OXFORD BLUE” to the black paint, and later you add white not to pur white but to this mix. It’s hard for me to describe where I painted the reflections of light, but for sure they were placed on the edges, and protruding parts, but I treated this subject pretty loosely and didn’t care too much for the realism and caring more for the overall effect and composition.

I hope this description contains some of the information you wanted to get, but if something was hard to understand – don’t hesitate and ask me 🙂