“Fourteenth of the Hill” – Repainting Triss Merigold, part 3

So we finally arrive at the last part of the description of my repainting Triss Merigold. This time we will take care of her leather corset and base, and the model will basically be done. 🙂
If you want to check the previous parts, here is part 1 and here is part 2.

Repainting the leather corset

So yeah, there have been some questions about the way I painted the corset. Well, I am not sure if it is the proper name for the piece of her clothing, but let’s just go with it. 😉

Basics for my leather painting

The whole painting thing was pretty straightforward, pretty similar to the process described in the section about repainting skin. You can look it up there if you haven’ yet.

See, similar method here – started with underpainting, too.

You wanted to know how I achieved the effect of worn and weathered leather. I’m always glad to share my experience with the community, but answering everybody individually becomes time-consuming and monotoneus. Because curious painters are my favorite kind of people ;), I will try to make your day with this article.

Test board. Nothing fancy. Just colors, numbers and some curly thing. 😉

Testing

I started working on the corset with a test board. I tweaked the color of my paint and checked the effects. Here are the paints I decided to go with:

Just because you don’t want to paint over things you have already done or simply want to keep some surfaces clean, you shouldn’t ignore masking. Once you’re ready, you can start painting!

Here you can see the colors put to use on the model already:

And on the back:

Pose carefully, look fancy. Even when being painted 😉

Applying colors

And here you can see the lightestcolors being applied on the front, but this is where the real fun begins…

Now I started testing methods of achieving this cracked, weathered look of worn leather. On the test board, obviously. Not risking the model yet!

I got the first satisfactory result from Vallejo Crackle Medium, which turned out great. I eagerly repeated the process on the corset and…? Nothing, as far as I could see. I got really suspicious if the Crackle Medium is not a capricious slut. 😉 So I told her she’s an energy vampire and I tossed her into a black hole. Don’t make me apologize for this! 😀

The culprit. There is no love between us!

Problem solved!

The next successful test was made with an effect presented to me by Rejven, my team-mate. It was originally a way to achieve marble effect and uses metal wool. You flatten it and use as a stencil for airbrushing.
If you try this method and initially fail, don’t get discouraged. 😀 I only appreciated my wool after a few attempts, and it was the best when it got all glued with paint.

It’s no crazy alien being attacking Triss. This is the metal wool I used 🙂

I applied a mix of varied intensity and color onto light base coat. Usually starting from lighter and going to darker ones. See it here:

Check the weathering on her leather bra part. That was really the effect I was going for!

See the weathering. Shaping up as planned!

Working on different parts of the leather, moving the wool to different parts of the model….

No, it’s not hair on her chest. 😀

Here’s how it looked on the lower parts of the corset:

And the darkest layers bring out the most of the weathering effect, creating the old leather effect:

Finishing touches

Finally I applied a bit of visual separation of the trimming and decorative stitches with my paintbrush:

That’s more or less the finished effect.

So that’s basically the whole process. For me the effect was completely satisfactory!

Repainting the base

This model’s base is boring but I had the impression that the wolf sculpt has some potential and can be interpreted in many ways. I decided to go with metallized rock effect. Thanks to the deep sculpt it didn’t require much more than using my airbrush nearly in parallel with the base and emphasizing the volume a bit. It must have been my favorite silver from Vallejo, which is 77.724 Silver.

I did the light reflex in the eye with Metallic Medium from Vallejo applied with airbrush. Then I covered it with a turquoise mix of inks. It’s important to use transparent paints to tint metallics, as they will not make surfaces look flat, but only saturate them with colors.

The next thing to do was using a paintbrush and black paint to paint cracks and grooves around the eye.

I colored the silver here and there by airbrushing some brown ink, and then I covered everything with clear varnish.

And this is what it looks like now:

The model is not finished on the photo, but the base is! 🙂

Done! My thoughts?

I hope I managed to encourage you to buy some statues and proved that they can really look good if you only put some time into upgrading them. Many of them were created by top sculptors, who are paasionate about capturing personalities of our favorite characters from games, comics or movies. I’ll gladly get myself a few more to enhance their looks.

I appeal to you that you don’t settle for the standard, mediocre, factory paintjobs, because it can only be better than that 😀

Now I am compiling a gallery of pics of the finished model, which I will share with you soon!

“Fourteenth of the Hill” – Repainting Triss Merigold, part 2

Welcome to another instalment of my repainting Triss Merigold series. You can see the first part here, and today I want to quickly describe two things: her skin and her trousers.

Repainting the face

The first thing I did was the skin, for which I used airbrush and some paints:

Here on the corset you can see an example of how I used the colors to build up the highlights and shadows, because the this is basically the same approach:

Underpainting in progress

I used some Vallejo 71.271 German Red Brown with a little Magenta Ink from Liquitex for shadows, and some white to underpaint the places for highlights.

I applied my skin tones with glaze of Vallejo 72.704 Elf Skintone and 72.703 Pale Flesh, which were later covered with a fine mist of thinner mixed with Cadmium Yellow Light Hue from Liquitex. 

Her skin is freckled only on a narrow part of her face, so I had to change my tool to a paintbrush and thinned down Brown Ink from Vallejo. After this stage I moved to painting hair for a moment, as I was not sure how the paint on the model would react with my paints and if it wouldn’t peel off from the masking around the hair. Fortunately everything went smooth, the paint kept sticking to the model and I could return to the face.

Some freckles, some work on the eyes. And no, that’s not the final look 😉

I painted her eyebrows with Vallejo 71.293, and slightly modified the color with a bit of 72.704 Elf Skintone.

I applied the shadows around her eyes by airbrushing Vallejo 71.048 Engine Grey and I outlined the eye with a paintbrush. Whites of eyes look good if you add some skintone to off white and only use white as the color for painting light reflections on eyes. I also corrected off white and shadows on her eyelids with a fine glaze, and the blush on her cheeks with Citadel Contrast Flesh Tearers Red.

It’s only when I already had the base color for the whites applied, that I outlined her iris, and I colored the eyes in the very end.

OK, I can consider eyes done. For now. 🙂

I slowly moved down, creating lights and shadows around the nose and mouth. I also added color to her lips, using the same paints I’d used in the earlier stages.

I added some detail to her lips….

Detailing the face, working on her lips.
Different angle
I think I can leave the lips like this. For now. 😉

… and just cleaned up everything, while adding touch-ups and details. The face was basically done, so let’s move to the trousers.

Repainting the trousers

For painting the trousers I needed to protect the upper body, so Triss dressed up as a ghost and went “BOO!” 😉

BOO! or imaginative masking 😉

The trousers were basically painted with two paints. The base was Vallejo 07.952 German Grey, and the highlight was 71.132 Aged White and 71.270 Off White applied in a zenithal way with my airbrush.

You can see one paint here. And imagine the others. 😉

The next stage was a bit more annoying, as I had to pick the right thickness of my airbrush paints and try to get the feel of the trigger to achieve the same kind of grain of the base color to texture the trousers in my planned way.

The texture is shaping up here.

This also gave me a chance to correct the placement of lights and shadows used to accentuate seams and construction of the trousers. Flexible masking tapes from Tamiya were perfect for this job.

Finally the most tedious part, the lockstitch, which is the decorative stitch on Triss’ trousers. But it was more of an exercise in patience than any secret techniques. Usual brushwork. 🙂

Triss Merigold – repainting part 2

Done (for now)

So yeah, here is what we have been discussing today and in the next part I’ll address the corset and the base. 🙂

Closer to the original artwork, if you ask me. Close enough for me!

See you soon 🙂

UPDATE: If you want to read the last part of the series, here is the link to part 3.

“Fourteenth of the Hill” – Repainting Triss Merigold, part 1

You may not believe me but for the last few years I’ve been working mostly with large scale models, so when it came to painting something for myself I could hardly remember how to squeeze all the transitions and details on a 32mm model, hahaha 😀
So instead of fighting I decided to simply change the subject (maybe to one Triss Merigold?).

My problem with collectible statues

I’ve always been envious of the great display cabinets of all the proud collectors. Sometimes I tend to forget why I don’t have one. Purchasing this Triss Merigold model was one of those moments of confusion 😉 but all my reason returned as soon as I unboxed her.

The beautiful design was flooded with paint, as if it was machine-painted. I won’t make a good collector as I cannot afford the quality that could satisfy me… And just to be fair, Prime One models also can fail to impress me. The sculpts are great, composition and scale too, and even casting quality can be totally satisfactory! But if I am to enjoy and appreciate those sculpts, I would rather enjoy them not “colored”.

This is the version from Prime One. Definitely a higher-end statue. Photo taken from Don Antonio Baltazar’s blog.

And no, I don’t mean those solid paintjobs we see on prototypes and master models, but the weaker models from production runs. I can barely understand why somebody who can afford such an expensive, limited model, so rarely decides to get it properly painted. Painted in quality that those beloved characters and great sculpts deserve.

Why Triss?

I’ve been a fan of the Witcher saga for years. And Triss Merigold was a character that felt pretty interesting to me, so when it came to choosing a statue I would like to add to my collection, the choice wasn’t all that difficult. The problem came when I saw the quality…

The box. Looks nice. 🙂

I know that Dark Horse statues are the lower end of the range of collectible statues, with brands like Prime One, Hot Toys or Sideshow placing higher than that, but still..

Triss Merigold that I received

The model I had was the Dark Horse version of Triss Merigold, official licensed statue of the character depicted in the popular games from CD Projekt Red. While the box looks nice and the pose is good, after unpacking the statue you can see that the quality seriously differs from the standards I’ve been used to:

Here’s what I received (photo on the left) compared to what is presented in Dark Horse’s online catalogue (right). Well, at least they’re not trying to pretend that the product looks anything like the box art. 😉

Here you can see some more close-up shots of the statue, and for those unfamiliar, it is not small at all! These details are there, just not painted properly despite the size…

I even recorded a short video to depict it:

Triss Merigold from Dark Horse – quick look at the quality

And if you have time for a slightly longer video, you can see some more details and angles here:

A bit longer video of the Triss statue from Dark Horse

This immediately gave me an idea – why not try repainting the statue, so it would be closer to the quality that I would agree to accept. As I said, I had been working with large scale collectible statues for quite some time already, but rarely had opportunity to do something outside of the production models, so having this chance for a hobby project felt great!

Triss Merigold that I wanted

Here’s the image I chose for my main reference.

Triss Merigold from Dark Horse, official box art
This is basically the art you get to see on the box. The printed version is slightly darker, but it seems to be the same image

You can surely see the differences between the box art, the painted model presented on Dark Horse’s website and the model I received, can’t you? 😀

Naturally there was more, so here are two more examples of my main inspirations:

While one comes from the game, the other is from Xenbis. I also took inspiration from pictures found on guild_hunter_of_vengerberg‘s Instagram account.

Potential issues

So when I inspected the model, I thought there were two problems I had to solve:

The model was made of rubbery plastic, the soft kind. Which meant any kind of modeling work would be difficult, or at least not as enjoyable as the miniatures we’re used to. So if you want to do any upgrading or converting to your statues, have it in mind.

The other thing I was a bit worried about was the base, which was rather boring and bland. Of course, it is not the standard of the Prime One version, so we cannot expect too much. But still it was very basic and not very inspired.

The last thing I noticed was that the model couldn’t be disassembled. It was a one-piece thing, so handling is not as convenient as it could be if I were able to remove some parts for the time of painting.

But knowing these things I was ready to start! 🙂

Getting started with repainting Triss!

The thing I disliked the most on the model was the face. You aren’t surprised, are you? 😀 So the face would be the first thing I would like to repaint!

But before the cool and creative, artistic part, the mundane has to be done. So we started with washing the model. 😉

We have to make you clean first, Triss, before we apply some make-up, OK? 🙂

After the model was cleaned and de-greased, I was ready to start painting! 😀

I’ll be posting updates on the repaint here, and what seems to be the main fields for upgrade are: the face, the corset and the trousers. And stitches, a lot of stitches…. 😀

UPDATE: Now you can follow straight to part 2 of this article or even to part 3. 🙂

Maagaan from Bane Legions – Review

BaneLords and Bane Legions

So I bought a couple of blisters from the Banelords range and was asked to make a review about them.

For those not familiar with the brand, it’s a range of “heroic” 28mm miniatures made by the well known UK shop Maelstrom Games, commissioning various world renowned sculptors and painters to work on that range.

You can find the Bane Legions website here.

You can find 2 ranges there:

  • The “BaneBeast“, which consist of a range of big, nasty beasts which won’t be the focus of this review.
  • The “BaneLords“, which is a range of “human-size” miniature, heroes and standard-bearers for your fantasy armies. The review will focus on this range.

So for this review I’ll show you one of the three minis I got from them:

Maagaan, warlock of Baalor

Here’s the painted version on their website :

Photo: Maagaan from Bane Legion - review

Ok, it looks quite great on the picture right?

What you get for your money

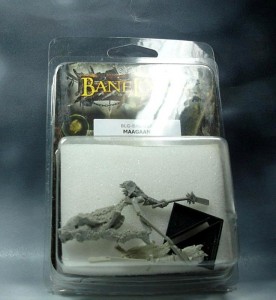
What you get comes in the form of a classic blister:

Photo: Maagaan from Bane Legion - review

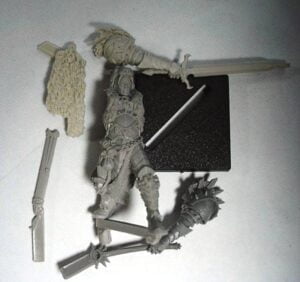
Once opened it looks like this:

Photo: Maagaan from Bane Legion - review

Resin

So, hopefully it shows from the picture but what you get is a very detailed “hard” resin mini.

The resin is what I’d call classic, unlike the Fine Cast one it won’t bend easily, it is more like Forgeworld one, just of much better quality. One word of advice, it breaks easily on wrists and ankles (noticed that on my elf standard bearers), so be careful while cleaning the mini.

Sculpting quality

On the cast/sculpt side, the details are great, very sharp. Not much to add, I hope the pictures talk for themselves:

Photo: Maagaan from Bane Legion - review

The parts comes with very little preparation work to do aside from the resin excess, there are of course some mold lines to remove but nothing bad, and pretty much no bubbles either. This is basically what I noticed from the 3 blisters I got from them so I guess they do have some great mold and casting process and some great quality control.

The assembly is also easy as they have put sockets to help the parts hold with glue.

Gamer says:

So overall, on the gamer side, what we get is an ever growing line of fine miniatures that will make great count-as heroes or standard bearers, especially for Warhammer Battle or Mordheim.

Painter says:

From a painter point of view, in my opinion you get a very nice, very well sculpted and detailed line of minis to toy with, they might not be too “conversion” friendly, but for me, this is definitely a nice painting range with either very dynamic or charismatic models.

— Ariakas

Verlinden Productions: Full Metal Jacket – Review

It’s time for another historical model. I’d bought it few months ago and finally found some time to describe it. So here it comes: Full Metal Jacket – review. Beware though, I do feel like writing today, so there might be quite a lot of text below…

Introduction to Full Metal Jacket review

This pretty big chunk of resin with some additional bits is made by Verlinden Productions and has the same name as one of the greatest Vietnam war-themed films, the Kubrick’s “Full Metal Jacket”. There is also second name on the box “G.I. Vietnam”. G.I. is a general abbreviation used by US forces to describe to military units (or Government Issue, or Galvanized Iron), and Full Metal Jacket is a popular kind of a bullet.

I was considering purchasing it for a long time already, as Vietnam War is my second most favourite historical period, just after the WW II. VP range actually includes more small dioramas like this one: “Good Morning Vietnam” (name taken after the film with awesome Robin Williams), “Flower Power” and others… I’m thinking about getting them all to make a big camp, but for now this scene will suffice. 🙂

The model – overview

As of now I’ve chosen – in my opinion – the best quality product: a soldier lying with Playboy in his hands and his gear all around him. A classic scene, lots of details and true Vietnam feel 🙂

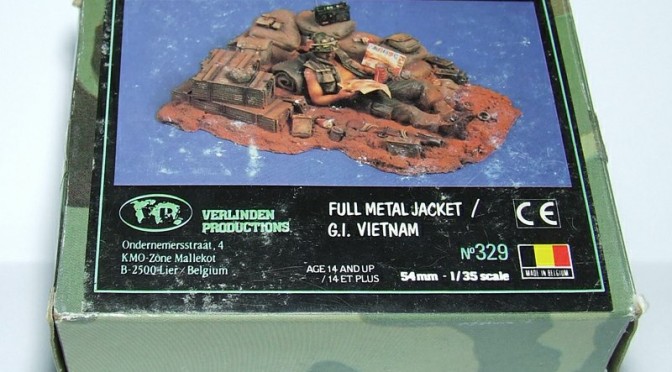
The model is in 1:35 scale. The catalogue number is 329, as you can see on the box.

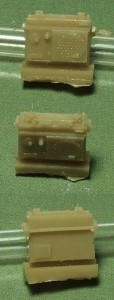
It is packed in a plastic bag and nice box with picture of the painted version. There are 6 elements inside, which you can use to create the whole scene – diorama, 2 arms, 2 heads and a radio.

Photo: Verlinden Productions: Full Metal Jacket - Review

Photo: Verlinden Productions: Full Metal Jacket - Review

Photo: Verlinden Productions: Full Metal Jacket - Review

Photo: Verlinden Productions: Full Metal Jacket - Review    Photo: Verlinden Productions: Full Metal Jacket - Review

Photo: Verlinden Productions: Full Metal Jacket - Review

Terrain

My review will start with the biggest element: the whole terrain around the soldier. The quality is of the highest level. Anyone familiar with this company will conform that their products are still considered to be one of the best on the market. Verlinden range covers loads of elements for vehicles (e.g. boxes, barrels, weapon, ammunition) as well as models. One can expect a whole lot of junk for dioramas from them as soon as bigger models (like the Abrams tank) are released. Majority of their products are provided for 1:35 scale.

The whole element is a one-piece cast. Nevertheless, the cast is perfect, as you can see on the photos. Cavities, holes, details and other shapes – there is nothing to complain about, even for myself 😀 I noticed just one issue, which is also visible on my pics – the scene was cut away from something else. I’m not sure what was it, but the cut is evident. Perhaps a bigger batch was cast, hence the cutting… there are this protruding bits around the sand. Anyway, these are not cast imperfections, just material excess cut off. One just need to cut and file it to solve the problem.

Photo: Verlinden Productions: Full Metal Jacket - Review

Photo: Verlinden Productions: Full Metal Jacket - Review

Photo: Verlinden Productions: Full Metal Jacket - Review

Photo: Verlinden Productions: Full Metal Jacket - Review

Photo: Verlinden Productions: Full Metal Jacket - Review

Photo: Verlinden Productions: Full Metal Jacket - Review

Photo: Verlinden Productions: Full Metal Jacket - Review

Photo: Verlinden Productions: Full Metal Jacket - Review

Details

Quality and precision of details is astonishing. If you don’t believe me, check the glasses frame, wrist watch, boxes with excellent wood texture or the peace symbol hanging from the soldier’s neck. I won’t even mention details of the radio, cans, cigarette boxes, facial hair or boot soles.

Photo: Verlinden Productions: Full Metal Jacket - Review

Even the M-1 helmet has a material pulled over it, with folds! By the way, don’t sand this element, as there are not mould lines 🙂 My only remark would be lack of visible nails, there are “only” perfectly executed hands;)

Flaws?

The model doesn’t have too much flash to be removed, and ones I’ve found result from the manufacturing process only, not the poor quality of forms. There are also just few delicate mould lines – careful filing and sanding will be sufficient to remove them. You could use a knife to scrape them off, if you feel confident, but remember this is resin, which can easily get damaged, especially in case of thinner, smaller elements.

My plans

My plan is to paint this model realistically, so I’m sure I’ll first watch the best (in my opinion) film about the war in Vietnam: “Apocalypse Now” (the director’s cut, of course, which I saw 3 times recently) with M. Sheen and great M. Brando, then most probably “Platoon” with Sheen’s son 🙂 So many famous actors there, and both are very good films. Anyway, I grew up watching them (and who didn’t? :)), so it will be nice to see them again. Not everyone is a fan of the subject, but most of us know these two productions.

And there is also my favourite chopper and workhorse of that war – Bell UH-1 Iroquois… but that’s completely different story…

Back to the model…

Painter’s opinion

Painting shouldn’t be difficult for anyone. One just need to get some pics and start painting. Colours true for that period are well known and you can find any required information in the internet. Of course, if you want to get deeper, you can get many books covering this subject, e.g. from the Osprey publications. Use green and olive shades for uniforms, with some tiger-stripes camouflage patterns, and Marlboro, Winston or Lucky Strike cigarette and you’re free to go;) I think you know how to paint ammo boxes too. Pastels and dry pigments might be useful to recreate dark ground and dust.

As for papers and centrefold… well, you can print these in proper scale (Playboy cover should not be a problem) or even paint, if you feel adventurous 🙂

Conclusion

I will rate this model 9.5/10 – almost perfect. The slight drawback (there always is something) are all these small bits, excessive material and mould lines. Nothing difficult to remove, but one needs to spend some time on these, as any observer would notice those on all the details.

I do recommend this model. The box might be a bit pricey at more than $21, bit it’s worth every cent! You pay for the quality, and quality to price ratio is really good in this case. You can be sure that you’ll get a top shelf product, and I’m sure you’ll have fun painting it.

— Slawol (who would like to thank Nameless for his translation and making this article available to our international readers)