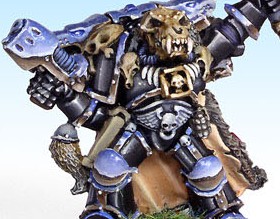
Maybe the huge hype for SE-NMM and NMM chrome has already passed, but this tutorial is surely still worth publishing. In 2005 I painted a Space Wolves wolf priest and people asked how to paint NMM chrome like the one on that model.
As I was receiving questions about my Wolf Priest and the way I painted him, I spent some time and typed this description for you. Maybe it’s not a typical step-by-step, but it’s the best I could do with the mini already painted and even not having it at home anymore. Enjoy 🙂
First steps
After spraying the whole mini black, I applied a layer of white over the kneepads and other elements which were supposed to be chrome.
Fur cloak
I painted the internal side of the fur with Vallejo GC41 “DWARF SKIN”. Then I highlighted its protruding parts and the lower parts where more light falls. I did it by adding more and more Vallejo MC918 “IVORY” to GC41.
I painted the fur to imitate the real wolf skin’s colors and patterns, using Vallejo MC992 “NEUTRAL GREY” near the outer parts (the edges), and Vallejo GC40 “COBRA LEATHER” nearer the center of the surface. When the paints were dry, I washed the cape with very thinned black paint.
Before the wash was dry, I applied another layer of white basecoat onto the parts which I wanted to be painted like chrome.
When the paint dried, I decided to add highlights: I used Vallejo MC907 “PALE GREYBLUE” for that, and with the side of the brush with tiny amount of paint on it I brushed along the whole fur’s surface.
Skulls
I started with basecoating with Vallejo GC40 “COBRA LEATHER” – except for the eyes and deep crevices. For highlighting I kept adding more and more Vallejo MC819 “IRAQUI SAND”. The last color applied was pure MC819.
NMM steel
I painted the steel (or silver) elements with the NMM method. For my basecoat I chose (like I always do) Vallejo MC903 “INTERMEDIATE BLUE”. The shading is done with black paint there, where you don’t need to go overboard with detailing and color transitions. There where I need smooth blending of colors I shade by adding more and more black to the black color. I clean and correct the parts which got messy, and highlight by adding more and more white to the base color. The final highlights are placed with pure white.
NMM gold
I used the same method to paint gold using Vallejo GC40 “COBRA LEATHER” as my basecolor, washing it with Vallejo MC939 “SMOKE”, and then – when the wash was dry – I highlighted with Vallejo MC877 “GOLDBROWN”. Where I wanted sharp highlights I placed dots of white paint.
I think I can omit the part about the grenade? 😉
NMM chrome
I started painting with drawing the horizon on all the chrome elements with Vallejo MC822 “GERMAN BLACK BROWN”. The color of the ‘ground’ reflected in chrome depends on the color of the potential terrain. I decided to mix this basecolor with Vallejo GC40 “COBRA LEATHER” and highlight it by adding Vallejo MC819 “IRAQUI SAND” to the mix. So I painted the reflection of the ground going from the darkest to the lightest color 🙂 and I paint the reflection of the sky in the same way. The upper part was painted with Vallejo GC22 “ULTRA MARINE” (with a slight addition of Vallejo MC807 “OXFORD BLUE” in the darkest part), and then I only highlighted adding more and more white. The sky just over the horizon must be white, just like the edges of the painted part.
The more the surface is leaning toward the ground, the more ground you see in the reflection. On the other hand – if the surface is rather pointing upwards, then you will see more sky than ground in the reflection. The same applies to painting the wolfheads. 🙂
There’s one more thing you need to remember while painting chrome – every ‘tube’ or long round element – regardless on its position – will always have the horizon’s reflection along the ‘axis’ of the element. You can see it on my Liralith (in Hassslefree Miniatures gallery).
Black armour
And now I had to clean up the black armour, which was stained and dirty after the whole painting. I covered it with black paint, and applied the first highlight. It covers the biggest part of the surface, and every next highlight is placed on smaller and smaller surfaces. But I think it’s obvious, isn’t it? 😀
I highlighted by adding white, but now I know that it looks good if for the first highlight you add a bit of Vallejo MC807 “OXFORD BLUE” to the black paint, and later you add white not to pur white but to this mix. It’s hard for me to describe where I painted the reflections of light, but for sure they were placed on the edges, and protruding parts, but I treated this subject pretty loosely and didn’t care too much for the realism and caring more for the overall effect and composition.
I hope this description contains some of the information you wanted to get, but if something was hard to understand – don’t hesitate and ask me 🙂


