Here is a little tutorial/review for the Instant Mold product that has been released by Cool Mini or Not (called CMON later in this article) some time ago.
Instant Mold review
The product should be available on their website in the Shop section. I’m not going to repeat what this product is aimed for since it’s clearly said in the description.
Instant Mold is cleary a nice product. You can do a lot of things, not everything but still lots. The level of details you can get is just breathtaking (of course it also depends on the original item). With a little training, you can do things like bases, weapons, and some other accessories, reaching a nice level of quality.
CMON said on their website: “Make your own bits” and that is exactly what I needed.
For the record, I started a Salamander army for Warhammer 40K, but even though Games Workshop and Forge World released a few things for this army, they unfortunately forgot (or didn’t want) to add the Salamander’s Insignia in the drop pod kit, so I decided, thanks to the Instant Mold, to make one.
I’m not going to repeat how to use the Instant Mold, it has been seen on CMON website and you’ll find hundreds of tutorials on the web, though it’s always nice to have some little tips which I’ll try to give here.
Here is what I used
- The item you want to mold (here it’s a FW front door for a Rhino)
- Instant Mold
- Something to cut with (scalpel, cutter)
- Something to pick up the Instant Mold from the hot water
- A little piece of plastic card
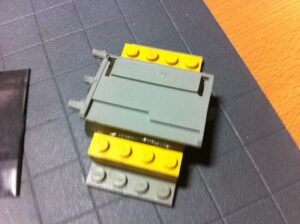
- Something to make a container/framework for the mold and something to press the item in it (here some Legos, the number is depending on the size of the item you want to mold)
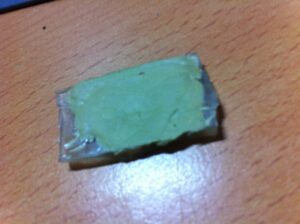
- Some stuff (here it’s Green Stuff but you can also use Milliput, Putty…)
The box
The first thing you want to make is to make the box that’ll be used as container. I tried doing it without and I ended lots of time having parts that weren’t molded properly or bubbles which wasn’t nice. I noticed that with the container everything was molded nicely.
The flat pieces in the bottom are there so that you can press heavily the item in the mold without ruining it with the circles of the Legos
Now that we have everything ready, we can start working with the Instant Mold.
Heating it up
After having put it in hot water (I have a boiling machine like the CMON guy and I put it in a bowl and then through the Instant Mold inside it) and have it ready, I place it in my container. I’m doing this in multiple times to be sure that I don’t have holes in the mold, or stuff that will make the final result crap.
Once you have fill the whole space with the Instant Mold, as you’ll notice, now, there are finger prints and bumps/holes all over the Instant Mold, so to avoid having a bad mold, I put it back like this in the hot water, taking care of not pressing it or whatever to soften it again a little so that I’ll be able to remove the fingerprints and bumps/holes using the plastic card
Push it!
As you can see, it’s not perfect, but it’s better. If you’re fast, you can directly press your item into the mold (I personally put it back in the hot water one more time, but it’s me) using something to press.
Once you’ve pressed it, you should have something like this:
Now you wait a little so that the mold hardened itself. Don’t try to remove the item from the Instant Mold while the Instant Mold is still soft, you might break some details here (and it’s not what you want). It takes usually 4-5 minutes to be completely hard, so be patient. You can check, while Instant Mold is hardening, if you don’t have bubbles or anything by flipping it.
If there are bubbles or anything, you should see it clearly. When everything is hard, you can remove the item from the mold.
Cleaning up
Now the next step isn’t necessary, but I found it easier. Cut the part that aren’t necessary
Molding
Once everything is clean, just prepare and put your putty/green stuff/miliput inside the mold.
Now, you just have to wait for it to harden. I personally wait like 8 hours. Why? Simply because I just want to be sure that everything is completely hard, because there are multiples micro details that are so easy left inside the mold.
Done!
Once everything is hard, you can easily unmold it by peeling off the stuff you used from the IM, no need to put the mold in hot water again (especially if you want to re-use it for the same item) because, even when green stuff is still pretty sticky, it won’t stick to the IM. Now you can just see the result.
Do you think Instant Mold is the answer to your needs? Is the quality sufficient? Did you have any problems wih it? Why don’t you share your comments about Instant Mold here?
Thanks,
— Hellspawn


