How to paint ruins bases – tutorial

In this tutorial explaining how to paint ruins bases from Micro Art Studio, I’m going to show you two of many possible colour schemes which you can use while painting ruins – first one will be with standard grey colours, like if you’re in some sort of castle (and later on I’ll call grey bases “castle bases”), and the second one will be “desert ruins” – some kind of old temple/church, once great, now forgotten. So, without any more introductions, here we go:

How to paint ruin bases: The ground

Step 1:

First thing you need to do, is basecoat your bases. I did it with Vallejo 950 Black, just because I ran out of both Citadel paint and spray:

How to paint ruins bases - tutorial (1)

Step 2:

So, now what to do next… Which part, which element now? Well, first thing you want to ask yourself, is: How much time do I want to spend on 1 base? Is it 1 minute? Maybe 5? Can I spend 20 minutes on 1 base? And, most importantly, will it be worth that time?

Well, let’s assume that we want to do it fast, without going back to destroyed elements, because we must do 200 of them. In that case I suggest you to make the deepest parts of the base – in this particular case, the earth. I used Citadel brown colour Mournfang Brown, old Bestial Brown, which I applied normally on specific parts. Remember – you don’t have to be precise at this part, so don’t waste your time trying not to paint stones:

How to paint ruins bases - tutorial (2)

Step 3:

After that step was done, I decided that I’ll create some shadows on the earth, to make deeper parts darker. I could just drybrush those parts where the earth should be brown instead of painting it, leaving black shadows everywhere – but I want dark brown shadows, not black.

That’s why I decided to use Citadel Agrax Earthshade shade, which I applied on brown parts. The same effect I could accuire using darker brown as a prime earth colour, and then drybrushing those parts with Mournfang Brown – pick your favourite method:

How to paint ruins bases - tutorial (2)

Step 4:

Next thing to do is light up the earth a bit – I mixed 1:1 Mournfang Bown and Citadel Ushabti Bone, and then applied it on brown parts with light drybrush:

How to paint ruins bases - tutorial (4)

Step 5:

To finish up the earth, I lightly drybrushed every brown part with pure Ushabti Bone – remember, make sure your brush is really dry, otherwise you’ll ruin the whole effect! It’s better to mix or even waste more paint that do everything from the beginning:

How to paint ruins bases - tutorial (5)

Step 6:

As the earth is done, we can go on. Next and last, in this particular case, thing we have to do, is paint stones. At this point I separated bases – 3 for grey bases, 2 for desert ones. From now on, we’ll split the tutorial into two parts – one about each kind of bases.

How to paint grey ruins bases

Step 7a:

While painting the earth you didn’t have to care about precision – now you have to. Especially near the painted brown earth. So I applied very gently 1 layer of Citadel Eshin Grey paint. I think that it’s the second darkest grey colour they offer, comparable to Mechanicus Standard Grey, which you can also use here. That’s how it looks (notice that we don’t care about the rims of base at all right now):

How to paint ruins bases - tutorial (7)

Step 8a:

After painting it with your favourite grey colour, I mixed 3 parts of Eshin Grey with 2 parts of Ceramite White, and then quite heavily drybrushed the whole base (but be careful, don’t destroy your beautiful earth!):

How to paint ruins bases - tutorial (8)

Step 9a:

Next step is to light it more – you can mix 2 parts of Eshin Grey with 3 parts of Ceramite White, or simply use colour named Administratium Grey. It will look pretty much the same.

Then again, drybrush the whole base – but now lightly. Pick your way with that – I decided that I’ll make sides of the base lighter. You can choose differently:

How to paint ruins bases - tutorial (8)

Step 10a:

The only thing to do now is to make one, final highlight – take your white paint and apply it very gently using drybrush on parts which were before treated with Administratium Grey. At this point, after you finish with white, you’ll also have to paint rim of the base with black colour – Abaddon Black from Citadel or any other black paint (like my 950 Vallejo black). And after doing so, your bases are done.

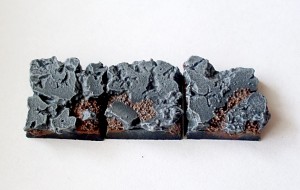
Here’s the final effect:

How to paint ruins bases - tutorial (9)

Let’s move on to the desert bases.

How to paint desert ruins bases

Step 7b:

Let’s move on from the common part about painting ground, as parts from basecoating up to fully painted earth are the same in both cases. Here again, while painting the earth you didn’t have to care about precision – now you have to. I used Citadel Tallarn Sand as a prime colour for those stones:

How to paint ruins bases - tutorial (10)

Step 8b:

Then I came up with an idea – why do I have to make it look like just plain stones with highlights, can’t I add anything catchy, something that will make my base special?

Well, if it’s old ruined temple why not some frescoes? You can make them as you want, with many colours or very few, big or small, untouched or very destroyed, simple patterns, complicated or just some letters. I made a simple pattern on the side of base – line of purple(Citadel Xereus Purple) and turquoise (Citadel Sotek Green) triangles accompanied with blacklining:

How to paint ruins bases - tutorial (11)

Step 9b:

As for something that is destroyed (in my case), frescoes also have to in bad shape. That’s why I “scratched” some frescoes paint from the edges of the base, and made some cracks inside the painting. After that, I used Citadel Seraphim Sephia shade to make shades all over the base (I skipped the earlier painted earth of course):

How to paint ruins bases - tutorial (12)

Step 10b:

Ok, frescoes are destroyed, bases have shading. Let’s move on a little bit, and start lighting things up. Before you’ll grab a brush, think for a while – how I want my base to be highlighted? Centre of it, just edges or maybe some other pattern?

I’ve decided to highlight edges and a little bit of centre of my base.

I used mix of 2:3 Ushabti Bone and Tallarn Sand, and then drybrushed the whole base lightly. Remember, you should also drybrush frescoes, but do it gently, otherwise you’ll ruin the whole effect by covering them fully:

How to paint ruins bases - tutorial (13)

Step 11b:

Then I reversed proportions, and made a mix of 3:2 Ushabti Bone and Tallarn Sand. After that, I heavily drubrushed the area of stones and very lightly frescoes:

How to paint ruins bases - tutorial (14)

Step 12b:

And at the end, I drybrushed whole base lightly with Citadel Ushabti Bone and painted the rims of the bases with black. That’s the end of making desert bases, here’s final effect:

How to paint ruins bases - tutorial (15)

Finished ruin bases

And so, here it is, the final effect of my work on 1 picture. A perfect bases for your Dwarf, Empire, Tomb King or any other army you want, which you can easily make by yourself in a matter of minutes!

How to paint ruins bases - tutorial (16)

List of used paints

  • Abbadon Black, Vallejo 950 – Basecoat, frescoes blacklining
  • Mournfang Brown – color of the earth
  • Agrax Earthshade – Shade used on earth
  • Ushabti Bone – Highlights on desert bases and earth
  • Eshin Grey – Prime colour for castle bases
  • Administratium Grey – highlights on castle bases
  • Ceramite White – Highlights on desert and castle bases
  • Tallarn Sand – Prime colour of desert bases
  • Seraphim Sephia – Shade used on desert bases
  • Sotek Green – frescoes triangles
  • Xereus Purple – frescoes triangles

– Lemartes

Snow base in 10 simple steps – Tutorial

Snow on bases! Yes, it’s great idea… but wait, I don’t have any “modeling snow” or anything like that. It’s not a problem for us. We can make a simple snow base in only 10 steps. Let’s go!

What do we need?

  • cork
  • base
  • static grass
  • baking soda
  • vicol glue (PVA glue)
  • super glue
  • water
  • paints: Black (VGC), Wolf Grey (VGC), Skull White (GW)
  • old brush

Snow base - tutorial (1)

Step 1

Glue a piece of cork to your base using super glue.

Snow base - tutorial (2)

Step 2

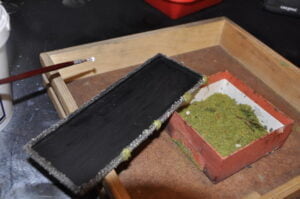
Paint the whole cork Black. I used a brush for painting this one, but if you want to make more bases you can use an airbrush.

Snow base - tutorial (3)

Step 3

Use the old brush.

Snow base - tutorial (4)

Drybrush your base with Wolf Grey.

Snow base - tutorial (5)

Step 4

Drybrush your base with Skull White.

Snowy base - tutorial (6)

Step 5

Use static grass and glue it with super glue.

Snow base - tutorial (7)

Step 6

Now we have to make the snow. Put some vicol (PVA) glue on the plastic pad.

Snowy base - tutorial (9)

Step 7

Add a few drops of water and mix it. You should have something with consistency of sour cream.

Snow base - tutorial (10)

Step 8

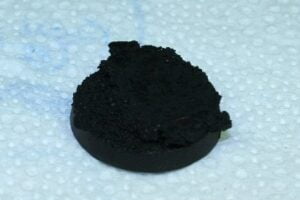
Add some baking soda and mix it. If you are not satisfied, you can add more baking soda. Now you should have consistency of porridge for children. Add some skull white to gain brighter snow.

Snowy base - tutorial (11)

Step 9

Put your snow on the base.

Snow base - tutorial (12)

Step 10

Wait until the snow is dry. You can put the base under a source of light, for example a lamp on the desk. After a few minutes the snow is dry and you can put a mini on your snow base.

Snowy base - tutorial (13)

Finished snow base

Snow base - tutorial (14)

Simple, wasn’t it? And how do you make snow for your bases? Do you have any tips you would like to share in comments?

— Rentall

NMM gold made fast and easy

Following Mahon‘s suggestion I decided to write my first miniature painting tutorial on Chest of Colors website. It is a tutorial about painting NMM gold my way – fast and pleasant.

Contrast is the most important thing in NMM technique.

This technique is intended for using mainly on tabletop quality figures, but with more layers (I used just 7-8 here, including base color and a wash) it can look quite well even on display miniatures.

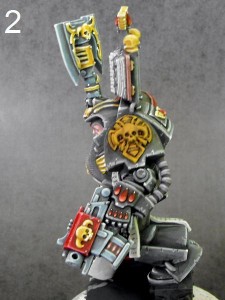
I will show my technique on terminator librarian shoulder pad. It is hard for me to give precise proportions, as I use mostly my intuition while mixing the colors.

NMM gold – JerzyK’s way

I start with base color (pic. 1) by mixing yellow with little brown and blue, ending in dirty yellow – it is just the way it should be 😉

Photo: Fast & easy NMM gold - Tutorial (1)

Then I make wash color by adding more brown to the mix and diluting it to dirty water consistency and apply it to the surface (pic. 2) – it helps to mark various hollows on the surface, which are afterwards emphasized with more precise application of another layer, which is basically wash color with addition of a little black.

Photo: Fast & easy NMM gold - Tutorial (2)

The next step is cleaning everyting a little bit with basic color (pic. 3) – washes can sometimes leave messy areas.

Photo: Fast & easy NMM gold - Tutorial (3)

I add a little white and blue to the basic color and focus on areas which would collect more light (pic. 4).

Photo: Fast & easy NMM gold - Tutorial (4)

From this step I will be creating more and more contrast, which is the most important thing in NMM technique. Another layer of lighter color (more white and blue) is applied within the limits of the first highlight (pic. 5).

Photo: Fast & easy NMM gold - Tutorial (5)

Finaly I use almost white highlight with pure white blicks on highest places (pic. 6).

Photo: Fast & easy NMM gold - Tutorial (6)

Sometimes before the last step (white and almost-white highlights) I apply blue or green strongly diluted layer if overall color is too yellow.

You can easily evolve my techniqe to get better results, but even now with just a few layers and little time you can achieve effect which look well on gaming miniatures (pic. 7).

Photo: Fast & easy NMM gold - Tutorial (7)

And here is another example of a miniature painted in a similar way:

Fast & easy NMM gold - Tutorial (8)

Happy painting!
— JerzyK

How to make movement trays for your units – Tutorial

So here’s a simple tutorial on how to make movement trays. It’s the most basic way to make a tray for both normal and magnetic bases for minis, but it can add a lot to the visual impact the miniatures make.

What we need to make a movement tray

    Here’s what we shall need:

  • a plate of thin steel (less than a milimiter will do but as long as you can cut it with scissors it’s fine)
  • a few pieces of balsa wood
  • some sand
  • super glue / PVC glue(any gloue for wood will do)
  • paints and some static grass

How to make movement trays

Cutting the movement tray

First: Let’s cut us a base for our tray! You must decide what kind of a tray you need. For example 3 ranks of 10 Games Workshop normal infantry is 10x20mm of width and 3×20 in depth. This will be the space inside the tray so it’s better to make it a little bit bigger.

For the mentioned example: 10x20mm is 200mm width and 60 mm depth. I usually add 15 to 20mm for to both length and width so that there will be more space in the tray and the unit will not be pushed tightly together. This is important for some units of minis can’t be placed in base to base for a number of reasons.

Also there must be some extra space for the side bars. Once you’ve decided how big must the base be, draw it on the piece of steel and cut it with scissors.

Photo: How to make movement trays - tutorial

Photo: How to make movement trays - tutorial

Making sides for our movement tray

Now we have our base for the tray. Cut the balsa wood so that you will have pairs of side bars. You might want to make 4 sides or 3 and leave the back of the tray open. I usually make 4 so the unit will not fall out while being moved. Glue them to the steel with the super glue. Hold it while the glue dries and make sure the side bars go well with the edges of the steel plate.

Photo: How to make movement trays - tutorial

Photo: How to make movement trays - tutorial

Adding texture

So here we have something that looks like a movement tray. Let’s make it presentable. Take the PVC glue and put it on the outer sides of the sidebars leaving the interior side and the underside (obviously) of the tray clean of glue. Once you applied the glue to one side of the tray throw some sand onto the tray’s side. The glue will catch the sand. Try to remove any sand that sticks to the bottom or the internal part of the tray. Try to do one side at a time.

Photo: How to make movement trays - tutorial

Let the tray dry off again and one more time CHECK IF THERE IS NO EXCESS SAND INSIDE THE TRAY! CLEAN IT WITH A KNIFE (or some other tool) while the glue is still wet.

Painting the movement tray

Once the tray is dry paint it black with a base coat of black spray and now drybrush the sides of the tray with the colours of choice (for a typical summer tray I use Scorched Earth, Bestial Brown and Bleached Bone of the Games Workshop Citadel paints.)

Photo: How to make movement trays - tutorial

Photo: How to make movement trays - tutorial

Now that this is done take the PVC glue again and make a few dots of it along the sides and throw some static grass on the dots of PVC.

Photo: How to make movement trays - tutorial

Photo: How to make movement trays - tutorial

Done!

And voila! The movement tray is ready! Making it probably takes less time than it takes to read this text. 😀

Here’s an example what a unit of miniatures can look on such a movement tray. The tray looks OK, don’t you think?

Photo: How to make movement trays - tutorial

— Rzymek

Simple bases in 5 steps

We keep being asked if we’re ever going to publish any tutorials for beginners in the miniature painting hobby. Sure, why not!


To get started with these articles, let’s follow these five easy steps to make nice but simple bases for your gaming miniatures.

Let me show you a simple and quick method for making bases.

What do we need to make our simple bases?

  • sand,
  • static grass,
  • white glue,
  • superglue,
  • bases,
  • cork,
  • paints: Bestial Brown, Vomit Brown (Citadel) and Lupin Grey (HMG Paints) or Space Wolves Grey (Citadel)

Photo: How to make simple bases in 5 steps - Tutorial

Step 1

Glue a piece of cork to your base using superglue.

Photo: How to make simple bases in 5 steps - Tutorial

Step 2

Glue some sand to your base using white glue to cover free space on the base.

Photo: How to make simple bases in 5 steps - Tutorial

Step 3

Paint the whole base black.

Photo: How to make simple bases in 5 steps - Tutorial

Step 4

Cork: paint with Bestial Brown and then drybrush with Vomit Brown.
Sand: drybrush with Lupin Grey.

Photo: How to make simple bases in 5 steps - Tutorial

Step 5

Use superglue to glue a mini to your base and white glue to add static grass.

Photo: How to make simple bases in 5 steps - Tutorial

Your base is ready! 🙂

You see, it wasn’t all that difficult.

Now if you would like more tutorials for beginners, just write what you would like to read about. What subjects would be the most interesting for you. We will do our best to follow your suggestions.