Hi everyone,
This is my first post on this site after lurking for a couple of months and admiring everyone miniatures.
I am really impressed by the amount of talent on this website and look
forward to visiting it each time.
Here is my problem.
I am currently building up and painting a Tyranid army, I have roughly around 1500 points right now.
My paint scheme is as follows...
...Flesh- Brown undercoat, dark red coat over that.
...Carapace- Black, Gareth-like design on the back(Your Tyranids inspired me). The black was then highlighted on the edges with grey.
...Hooves, claws, teeth- Painted with a brown undercoat and then painted again and highlighted with a bone color.
Now finally we get to the problem.
Since Gaunts have pretty flat surfaces on their skin without any real edges or shallows I can't really shade all that well.
Do you guys have any suggestions to give it a more dynamic and less flat look?
I can take a picture of a Hormagaunt if you would like to see how I painted it.
Any help would be awesome.
Thanks for looking and have nice day,
Ravener
Highlighting Questions New Pictures
Highlighting Questions New Pictures
Last edited by Ravener on 3 Mar 2007, o 14:56, edited 1 time in total.
-
Angel_of_Menoth
RE: Highlighting Questions
Well, the top of the model is naturally going to be getting more light than the underside. This is the same theory that you've already been applying. Things are brighter/lighter where the light falls on them. layering up the brighter colored highlights with that in mind is a good place to start.
Here's an example (picture is currently in a contest, so please use your imagination):
You've got a model with an out-stretched arm. The arm has a smooth glove over it. The crease at the elbow is easily seen as an area of shadow, but the rest of it is pretty bland. I started from my dark base color over the entire glove. Then I added a brighter layer over the entire arm except for the darkest parts (crease, where the fingers curled together, etc.) The third layer is where i started to pick out more where the light would naturally fall. The 4th, 5th, and 6th layers were never applied on the underside of the arm.
The whole glove is smooth, and is only one color (green). I used the color layers to show where the light is naturally falling. It is a bit more difficult when you don't have something dynamic like cloth or hair, but the principle is the same.
I'm sure people will point you to some nice pictures. I'm at work right now, so I can't afford to take the time to link to some things in the showcase.
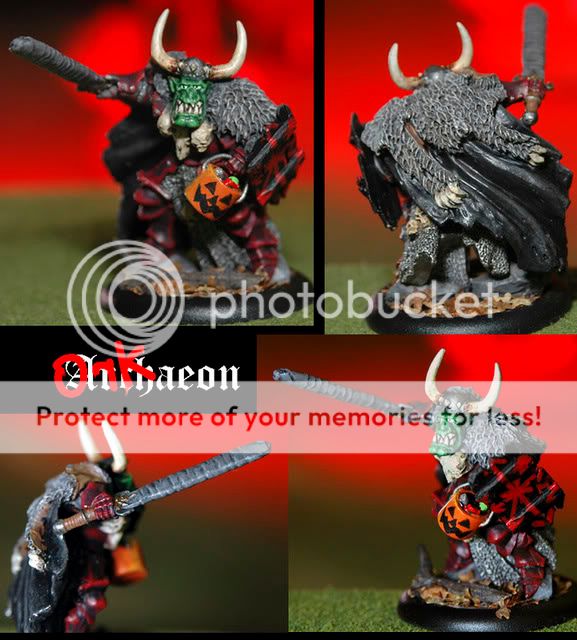
This isn't the greatest example for you, but it's the best I could find on short notice. I did a little bit of highlighting on the upper side of the candy bucket (best picture for seeing it is probably bottom left). There's definitely no highs and lows on that bucket (it's made from part of an ink pen), so I had to show where the light was hitting it. I haven't looked at Hormaguants in a while, but I'm sure they've got a bit more going on that a simple bucket.
Another thing that can help sometimes is to have a flashlight that you can hold about 6" away from the model where you want the light to be coming from. You'll be able to see where the light is hitting the model vs. what is in shadow. There's no better way to show you where light would hit a model than by hitting a model with some light.
Here's an example (picture is currently in a contest, so please use your imagination):
You've got a model with an out-stretched arm. The arm has a smooth glove over it. The crease at the elbow is easily seen as an area of shadow, but the rest of it is pretty bland. I started from my dark base color over the entire glove. Then I added a brighter layer over the entire arm except for the darkest parts (crease, where the fingers curled together, etc.) The third layer is where i started to pick out more where the light would naturally fall. The 4th, 5th, and 6th layers were never applied on the underside of the arm.
The whole glove is smooth, and is only one color (green). I used the color layers to show where the light is naturally falling. It is a bit more difficult when you don't have something dynamic like cloth or hair, but the principle is the same.
I'm sure people will point you to some nice pictures. I'm at work right now, so I can't afford to take the time to link to some things in the showcase.
This isn't the greatest example for you, but it's the best I could find on short notice. I did a little bit of highlighting on the upper side of the candy bucket (best picture for seeing it is probably bottom left). There's definitely no highs and lows on that bucket (it's made from part of an ink pen), so I had to show where the light was hitting it. I haven't looked at Hormaguants in a while, but I'm sure they've got a bit more going on that a simple bucket.
Another thing that can help sometimes is to have a flashlight that you can hold about 6" away from the model where you want the light to be coming from. You'll be able to see where the light is hitting the model vs. what is in shadow. There's no better way to show you where light would hit a model than by hitting a model with some light.
Re: RE: Highlighting Questions
Hi,Angel_of_Menoth wrote:Well, the top of the model is naturally going to be getting more light than the underside. This is the same theory that you've already been applying. Things are brighter/lighter where the light falls on them. layering up the brighter colored highlights with that in mind is a good place to start.
Here's an example (picture is currently in a contest, so please use your imagination):
You've got a model with an out-stretched arm. The arm has a smooth glove over it. The crease at the elbow is easily seen as an area of shadow, but the rest of it is pretty bland. I started from my dark base color over the entire glove. Then I added a brighter layer over the entire arm except for the darkest parts (crease, where the fingers curled together, etc.) The third layer is where i started to pick out more where the light would naturally fall. The 4th, 5th, and 6th layers were never applied on the underside of the arm.
The whole glove is smooth, and is only one color (green). I used the color layers to show where the light is naturally falling. It is a bit more difficult when you don't have something dynamic like cloth or hair, but the principle is the same.
I'm sure people will point you to some nice pictures. I'm at work right now, so I can't afford to take the time to link to some things in the showcase.
This isn't the greatest example for you, but it's the best I could find on short notice. I did a little bit of highlighting on the upper side of the candy bucket (best picture for seeing it is probably bottom left). There's definitely no highs and lows on that bucket (it's made from part of an ink pen), so I had to show where the light was hitting it. I haven't looked at Hormaguants in a while, but I'm sure they've got a bit more going on that a simple bucket.
Another thing that can help sometimes is to have a flashlight that you can hold about 6" away from the model where you want the light to be coming from. You'll be able to see where the light is hitting the model vs. what is in shadow. There's no better way to show you where light would hit a model than by hitting a model with some light.
Thanks for the lengthy and in depth response.
I am going to try the flashlight idea right now and then see if I can slowly start building up the highlights.
Maybe I will post a picture later on.
Thanks for the help and have a nice day,
Ravener
-
Skrit
- Needs more explanation

- Posts: 10608
- Joined: 9 May 2005, o 15:34
- Location: The Netherlands, Breda
RE: Re: RE: Highlighting Questions
Maybe an ink would bring out the depth (and highlight) out a bit more and the shine it creates gives a nice organic feel...
Re: RE: Re: RE: Highlighting Questions
Like Vallejo Dark Wash?Skrit wrote:Maybe an ink would bring out the depth (and highlight) out a bit more and the shine it creates gives a nice organic feel...
-
Demi_morgana
- Chest of Colors

- Posts: 15233
- Joined: 9 Apr 2005, o 02:51
- Location: Eldorado
- Contact:
RE: Re: RE: Re: RE: Highlighting Questions
for instance 
just don't forget to dilute it and use several thin layers instead of one "thick"
just don't forget to dilute it and use several thin layers instead of one "thick"

Re: RE: Re: RE: Re: RE: Highlighting Questions
What ratio to water would you recommend?Demi_morgana wrote:for instance
just don't forget to dilute it and use several thin layers instead of one "thick"
Have a nice day,
Ravener
-
Angel_of_Menoth
RE: Re: RE: Re: RE: Re: RE: Highlighting Questions
for ink washes, I use at least 3:1 water:ink. Usually I go a good bit heavier on the water, and mix in some glaze medium sometimes. i've been using at lot of 8:1 and 10:1 lately.
-
Demi_morgana
- Chest of Colors
- Posts: 15233
- Joined: 9 Apr 2005, o 02:51
- Location: Eldorado
- Contact:
RE: Re: RE: Re: RE: Re: RE: Highlighting Questions
sometimes I add just a bit water, sometimes a lot - depends what effect I want to achieve
You have to test and learn what kind of paint You like to work with the most
You have to test and learn what kind of paint You like to work with the most
Re: RE: Re: RE: Re: RE: Re: RE: Highlighting Questions
I think I will paint a normal Gaunt and test some different paint techniques on him.Demi_morgana wrote:sometimes I add just a bit water, sometimes a lot - depends what effect I want to achieve
You have to test and learn what kind of paint You like to work with the most
I really want to become a good painter. I realise it takes alot of practice and devotion. The problem is there is no one near me that could help me bring my painting to the next level.
Right now I can drybrush, highlight to a certain extent and shade.
I basically know the basics and can apply them.